De Kamiel

Offered by: ZirconfleX

http://www.zirconflex.be

Install & Configure Linux-Mint19 pdf

Preparation

  1. It's best to do a complete clean install.
  2. Don't us dual boot. Not because it doesn't work but because of speed and it's always going to be a half-hearted solution.
  3. If installing Linux Mint on an exiting PC, make sure to update everything important onto an external drive because the installation procedure requires to (re-)partition the drive where Linus Mint is going to be installed. (re-)Partitioning a drive destroys all data on that drive.
  4. To continue you need two USB drives.
  5. It is assumed that the OS is going to be installed Dell laptop and on a UEFI system.

Software

  1. Download the newest Mint version from here.
    1. I've downloaded the Cinnamon - 64-bit version (what looks today the most obvious for any PC.)
  2. If you're on Windows, use a tool to create a bootable USB drive from the downloaded ISO.
    If your on Linux, use a build in bootable USB disk creator or use these command lines in a terminal:
    1. Plug in the USB drive and determine the device it's mounted on with the command:
      sudo fdisk -l
      Example: it was /dev/sdc1 for me, so I'll use that as my example.
    2. Umount the device
      umount /dev/sdc1
    3. Not sure if necessary but I formatted the drive in FAT32, just in case
      sudo mkdosfs -n <Label-for-USB-drive> -I /dev/sdc -F 32
    4. If the ISO is using isolinux and not syslinux call the isohybrid command, which allows for an ISO to be recognized by the BIOS from a hard drive. Find out more about the command here.
      isohybrid filename.iso
    5. Next step is to copy and uncompress the ISO onto the USB disk.
      sudo dd if=<ISO-Filename>.iso of=/dev/sdc bs=4k status=progress
      Then do the following before unplugging the device:
      sync
      sudo eject /dev/sdc

  3. Preparations to be able to install Mint are done. Continue to make the PC ready for the Linux Mint installation therefore download Gparted. Download the gparted-live-<version>-amd64.iso for newer (>2010) computers with UEFI instead of legacy BIOS try this one.
  4. Create a bootable USB drive from the Gparted ISO.

Hard Disk

We could do what most people do, plug the USB drive in to PC. Boot it or reboot it in single boot mode. Select the USB-drive to boot from. Boot and start a Linux Mint installation. This will perfectly work but I learned that then after install the system is as slow at startup and functionality as Windows is. So we can do better with a small amount of extra work. That’s why we created the Gparted USB-drive.

Insert the Gparted USB-drive and boot or reboot the PC. Enable the BIOS menu(s) (press F12 at boot for a Dell PC) and set the PC to boot from the USB-drive. Save and close the settings and let the PC boot in Gparted mode.

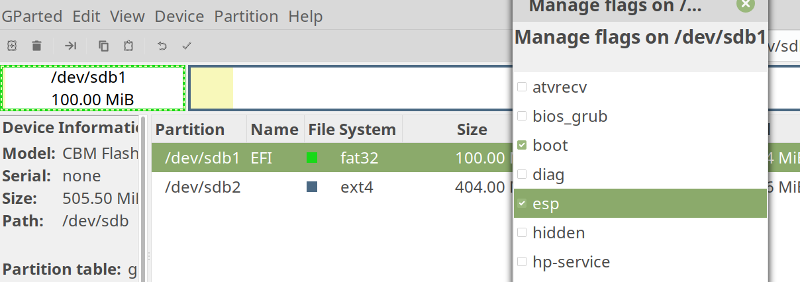
When Gparted started, make the Gparted view/window as big as possible (get a good overview).

  1. Select the drive, [Gparted]-[Devices], that's going to be the boot drive.
    • On a PC with a single hard drive, there can only one drive to be the boot drive.
    • On a PC with multiple hard drives we will need to choose what drive to use as boot device.
  2. Select the chosen drive and delete, [Partition]-[Delete], all partitions on that drive. When the delete option is grayed out, it might be possible that the drive is mount. unmounted, [Partition]-[Unmount], it first.
  3. To use UEFI, a UEFI partition must be created on the drive first. Then other partitions can be created.
    1. Have a GPT partition table on the hard drive you want to install to. Check, [View]-[Device Information], and if needed change the partition table type.
      Figure 5

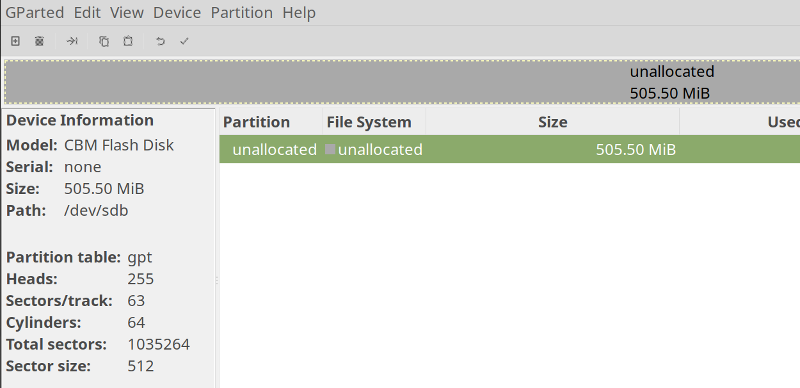
      If the partition table attribute reads msdos instead of gpt, then it's wrong and need to be changed. Select the disk of which you want to change the partition, then select [Device]-[Create Partition Table] from the menu. A warning about destroying all data will pop up. The warning contains the current type of the partition msdos what is the old format. Click msdos and select in the presented list gpt. All other options are for other operating systems or architectures.

      Figure 6

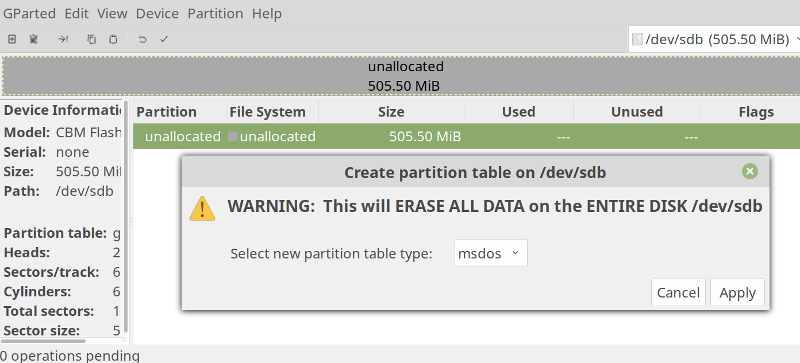
      REMARK 1: If a warning displays that the device contains active partitions, unmount these first (2). Note that you cannot unmount partitions of your currently running operating system.

      REMARK 2: Unfortunately creating/changing a new partition table destroys the existing one and all data on the disk.

    2. Create a EFI system partition. This partition type is `ef00` and usually contains a FAT32 file system.
      Do this as:
      • [Partition]-[New].
        Figure 7

      • In the pop up screen enter:
        • New size (MiB): 600
        • Partition Name: EFI System Partition
          • File System: fat32
          • Label: EFI Boot
      • Click [Add] and then tick the Tick

        tab in the main window.
        Figure 8

      • A new pop up will appear, click [Apply] to proceed and apply all changes. When all changes are applied click [Close].
      • Make the EFI partition bootable.
        Select the partition and right click it.
        In the fall down menu select [Manage Flags]
        The tick the voting box in front of boot, automatically a vote will be displayed for esp.
        As showed in the figure below.
        Figure 9

    3. Create now the other partition or partitions.
      • Assume Linux Mint is installed on a single partition, letting Mint decided how to divide the partition.
        Then do:
        • Click the remaining unallocated space.
        • Right click it and select in the menu [New]
        • Enter or check following parameters:
          • Create as, must be: Primary Partition
          • File System, this must be: ext4
          • Label, enter a label, or not if you don’t want.
        • Click [Add]
        • Tick the Tick tab in the main window.
        • Click [Apply] and when everything is finished, click [Close]
        • Close Gparted.
      • If Mint needs to be installed on a manual partitioned drive, go to Partition a Drive.
    4. Assumed is that the drive has a small UEFI boot partition an a large user partition where Linux Mint can be installed.
    5. Before starting the Linux Mint installation some settings in the BIOS need to be done to allow a quick boot and obtain a fast system.
    6. Boot into the BIOS, check it and change some boot settings.
      • Shut down the PC if it was running.
      • Press the power button to turn the PC on.
      • Press as soon as the power button is released and before the Dell logo appears the [F12] key on the keyboard.
      • The PC will now boot in BIOS mode showing something like below menu.
      • Figure 10

      • Select, using the up and down keys, under *OTHER OPTIONS, BIOS Setup*.
      • This will show a menu structure as showed below:
      • Figure 11

      • Use the up/down arrow key or the mouse to select *Boot Sequence* and tap [Enter].
      • The menu as displayed below is now popping up.
        Figure 12

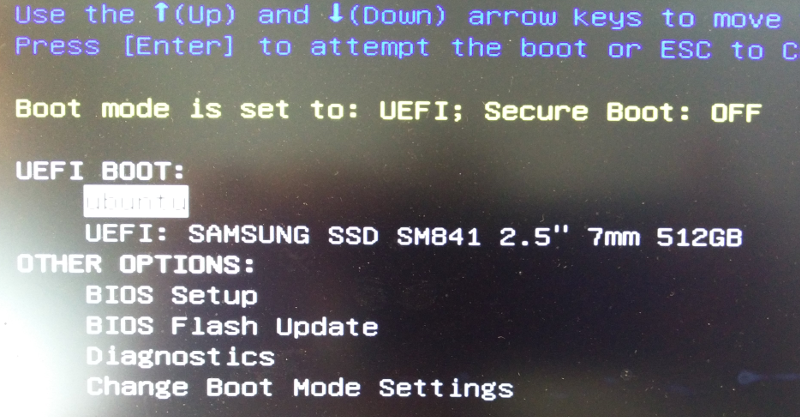
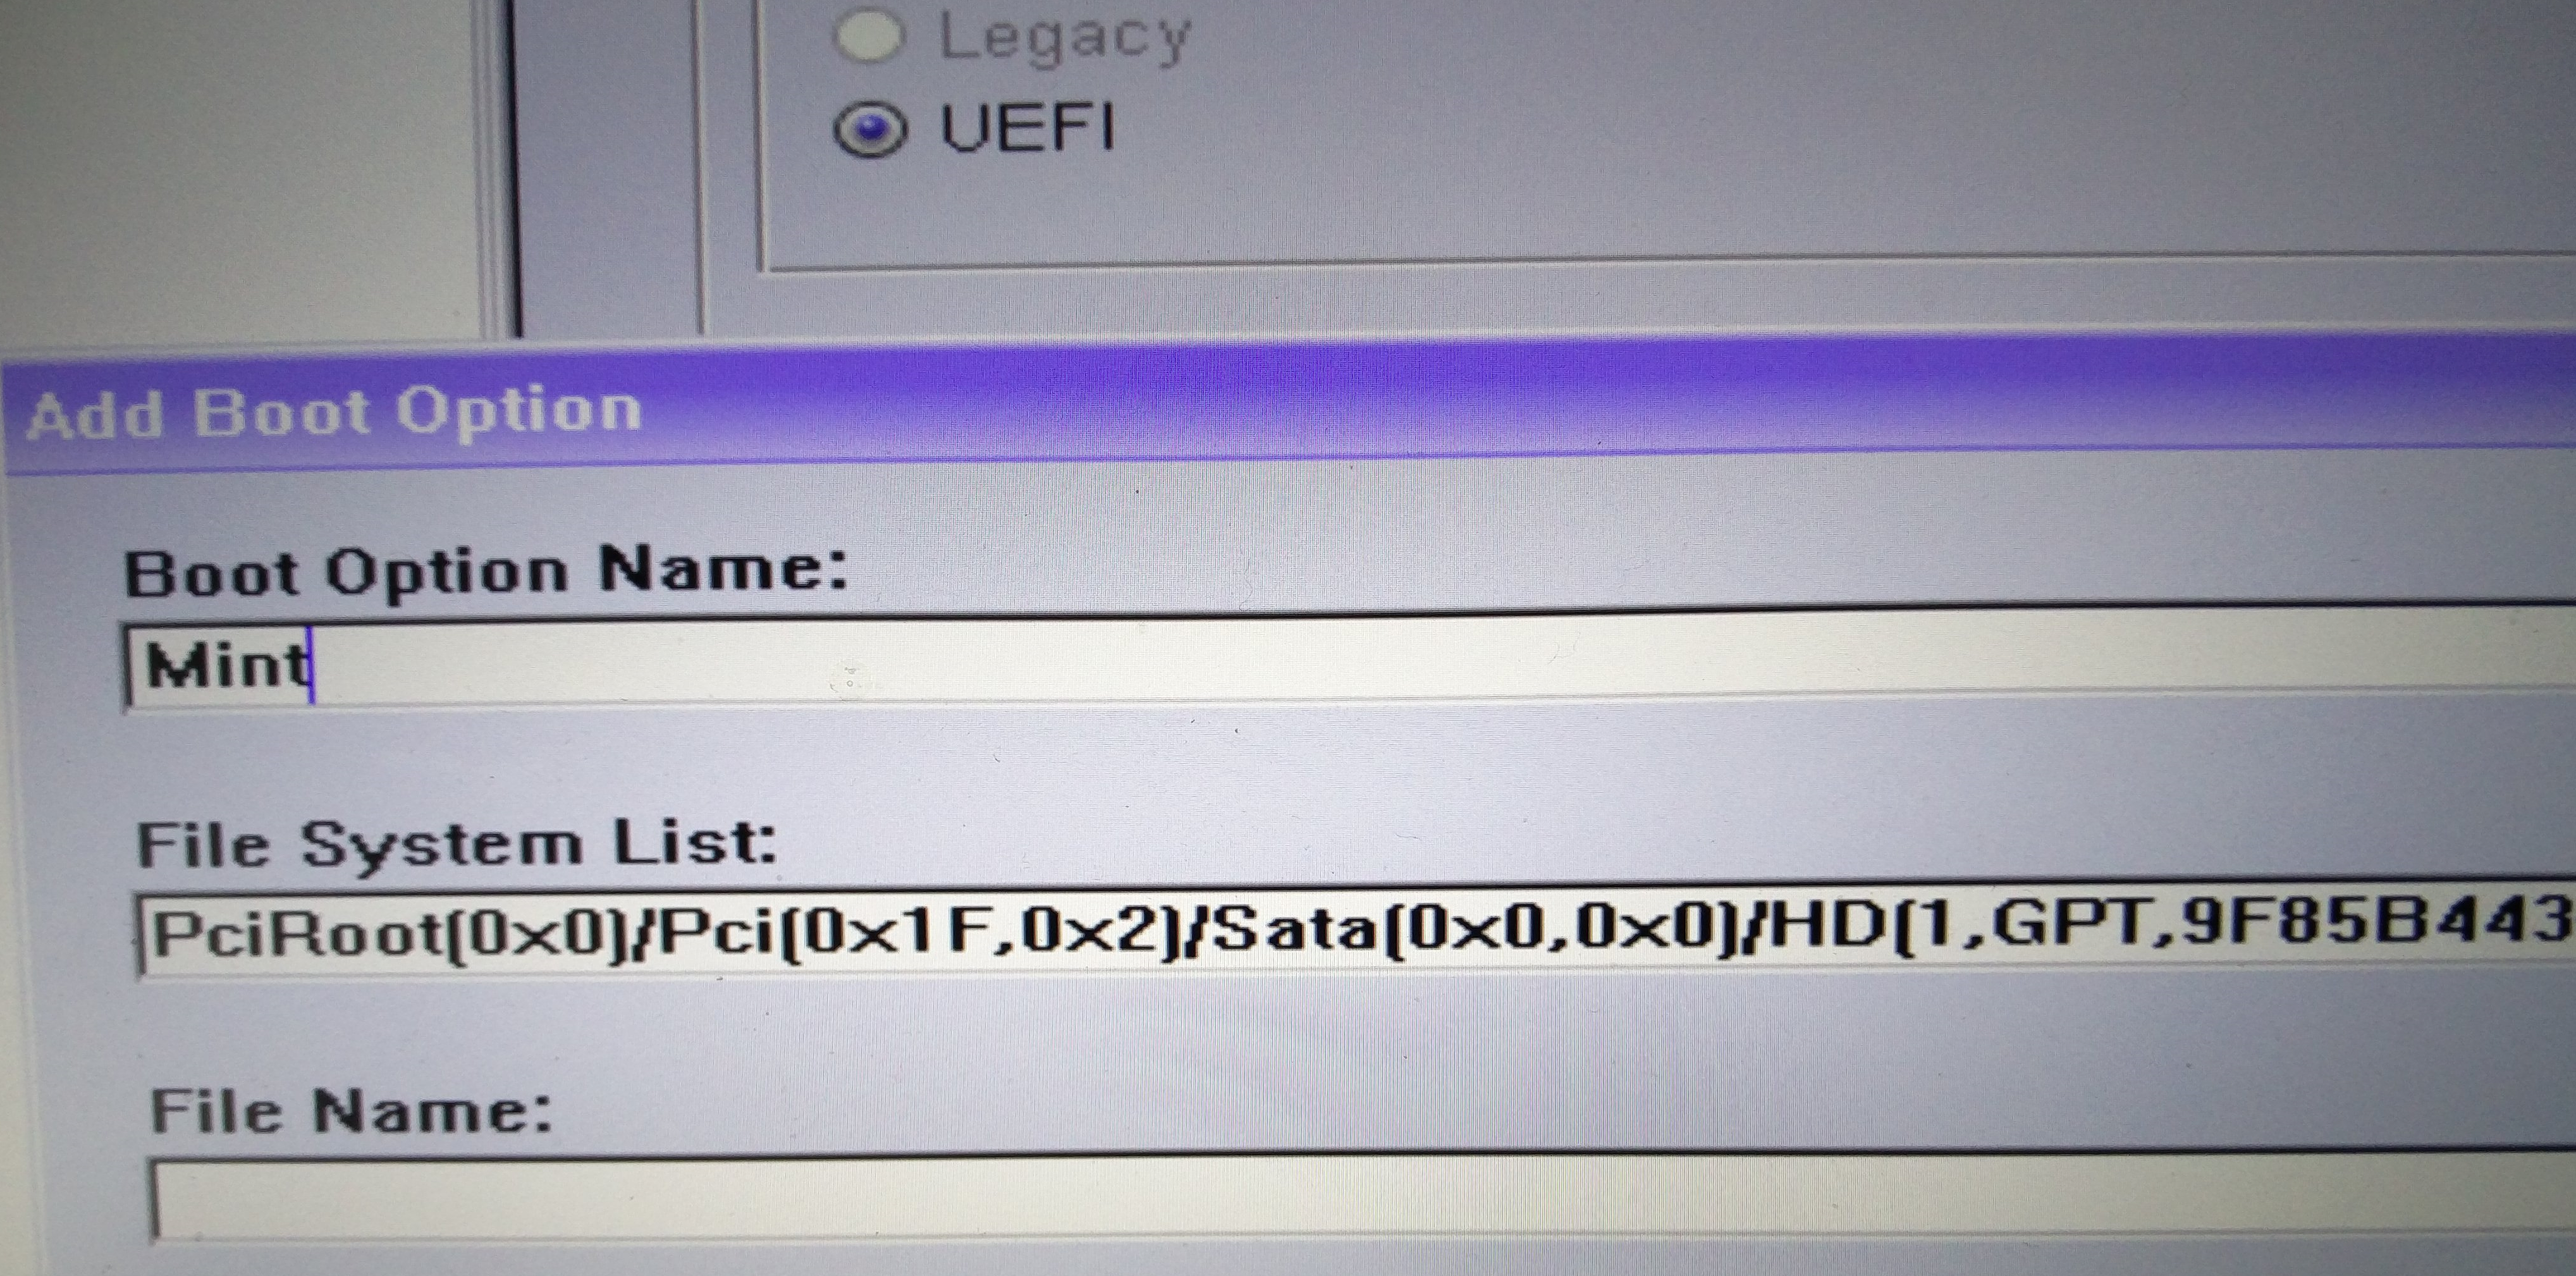
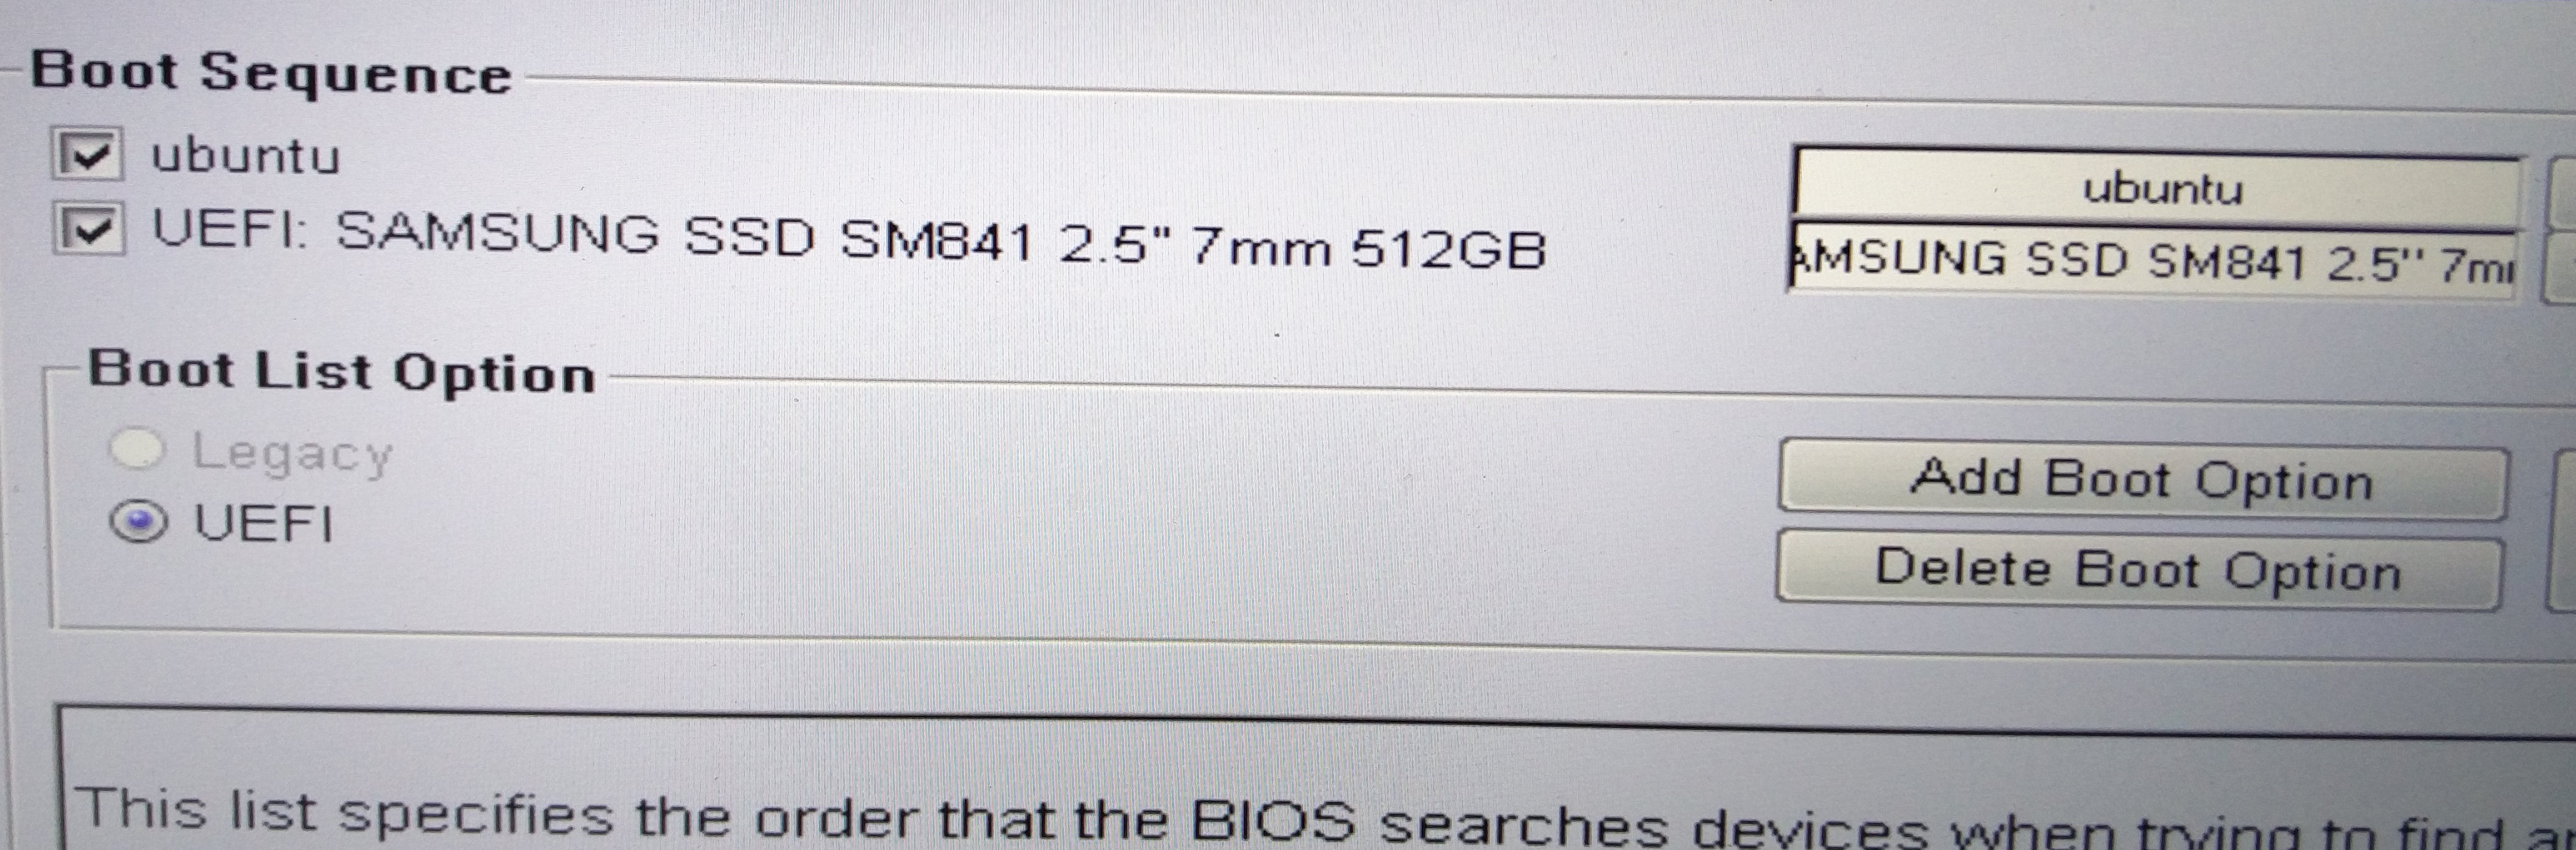
        In the figure above two devices are visible in the *Boot Sequence* part of the screen. It is possible that there are multiple items listed and that seems to slow down the boot speed of the PC enormously. Let us remove everything from that list and add only the necessary boot devices.
        • Click in the *Boot List Option* the [Delete Boot Option] button to remove boot devices from the boot sequence list.
          Do this till the list is empty.
        • Click then [Add Boot Option] and in the pop up menu:
          • Select the hard disk designated as boot device in the [File System List].
            This is the disk were an UEFI partition has been created. View the figure below.
            Figure 13

        • Enter a [Boot Option Name] like Mint or Ubuntu or …
      • Click [Add]

    REMARK: When installing on other PC brands, similar options as discussed above are available in the BIOS. Sometimes a extra option need to be set in order to make the PC boot in UEFI configuration before loading other drivers. Make sure to set this option.

    1. Plug the Mint bootable USB drive in a USB slot.
    2. Save and Exit the BIOS and let the PC reboot.
    3. before the Dell logo appear push the F12 key. Thus as soon as the PC attempts to start boot, push the key a couple of times.
    4. The PC will show the BIOS Boot Menu.
      1. The USB drive will, when everything went well, under the UEFI BOOT option.
      2. Select it using the up/down arrow keys and press [Enter].
    5. The PC will boot from the Mint USB disk.
      Probably you will need to select to start Mint 64-bit in a grub menu.
      After boot there is a full functional Mint version at your disposal while it is running from the USB disk.
    6. Click the [Install Linux Mint] icon.
    7. A menu setup will ask:
      1. Select the language and press [Continue].
      2. Select the keyboard setup and press [Continue].
        Test the special keys of the keyboard in the provided test line.
      3. Tick the box to install third party software.
      4. Tick the first option to install a fresh Mint option.
        I’m leaving the partitioning job of the hard disk over to the installer.
        If one wants a particular partitioning then select that options in the installation menu and provide the partition scheme you want.
      5. Follow all menus and answer all questions asked.
      6. Let Mint install on the PC and at the end remove the USB drive and press [Enter] to let the PC reboot.

    You should have now a very fast booting Linux Mint PC.

    Be aware that after the first reboot the OS will want to install a big amount of updates!
    Allow this to happen.

    • The Update manager will pop up and present a long list of software that needs to be updated or upgraded.
    • Make sure all packages have a green tick-mark and then click [Install Updates].
    • Enter your password and let the OS update itself.
      Probably it will need a reboot after this large update session.
      After the reboot it’s possible that a new set op updates pops up, allow these to happen.

    REMARK: The first time the software updater starts it will ask to setup system snapshots.
    Follow the procure to do this. System snapshots will be taken from that moment on regularly base and can save you life later on.

Customize the Base Installation

This is something everybody needs to do following his/her own taste and colors. The chapter below only provides a set of basic customisation making the use of Mint more enjoyable.

  1. Install missing proprietary graphic and communication drivers. When the PC is equipped with an Nvidia or other graphics card or the Ethernet card uses specific, such as Broadcom, devices it might be interesting to install the drivers for those specific devices.

    Installing the latest graphics and other dedicated drivers is one of the first things you should do after installing Mint or any other Linux distributions.

    To get the most out of graphic cards like Nvidia use the provided proprietary/restricted drivers supplied by the manufacturer of the graphics card in favour of the general drivers supplied by the Linux distribution. The same applies for other dedicated hardware.
    • Start the Driver Manager from the start menu.
    • Enter your password.
    • After updating of the cache the tool presents options for the hardware that can benefit from proprietary drivers.
    • Install the recommended driver(s).
    • Restart the PC after the driver installation.
      Figure 14

    • These are the proprietary drivers default in the Linux Mint repositories. Nvidia for instance outputs on regularly base new drivers for their video cards. First for Microsoft but soon after also for Linux. Thus lets find out if there is not a more recent video driver for the Nvidia card in the PC. Add Nvidia repositories to the software sources in order to find new drivers, at the same time the presence of the repositories will make sure that when new video drivers are available they are installed when performing a software update.
    • Add the graphics drivers repository of Ubuntu to the machines repository list.
      sudo add-apt-repository ppa:graphics-drivers/ppa
      sudo apt-get update
    • Open the Software Sources manager and check if the graphics drivers repository is indeed add to the list. There should be under the [PPAs] tab a new repository, probably the only one now, showing Graphics-Drivers and Graphics-Drivers (Sources). While under [Authentication Keys] a line showing *Launchpad PPA for Graphics-Drivers* should appear.
      If that's the case do next.
    • Start System Settings and click the Driver Manager icon in the bottom of the window.
      When its window pops up a list of available graphic drivers should show.
      But what driver to install, well:
    • Open a terminal and type: ubuntu-drivers devices
      That will present a list of all available drivers and tell what the best driver is for the system. Style:
      Figure 22

    • Go back to the Driver Manager and tick the voting bullet left of the driver listed as recommended in the terminal output. In this case it's nvidia-driver-418.
    • Wait until it's installed and hit the [reboot] button.
  2. Optimize the SWAP space usage.
    • Check the current swap setting.
    • Open a terminal and type at the command line: cat /proc/sys/vm/swappiness
      If it reports 60 or a different number than 10, set it to 10.
    • Do this in the open terminal, type sudo xed /etc/sysctl.conf on the command line.
    • Scroll to the bottom of the page and enter there:
      # Decrease swap usage to a more reasonable level
      vm.swappiness=10
    • Save the file, restart the PC and check the swappiness again.
  3. Improve battery life by installing TLP for Linux

    TLP is a great command line tool for improving the battery performance for your laptop running Linux mint 19. This advanced power management tool comes with automated background tasks which can help you get the most out of your battery.

    To install TLP in Linux Mint 19, sudo add-apt-repository ppa:linrunner/tlp
    sudo apt update
    sudo apt install tlp tlp-rdw
    sudo tlp start

    Most noteworthy is that the default settings would be the recommended one and that it is safe to assume that it would do well enough.

  4. On a laptop (desktop too) with full keyboard (keyboard with side numeric keypad) it is handy when the keypad is on from boot. To obtain this effect do:
    • Install numlockx: sudo apt install numlockx
    • Open the *Login Window* application and select the Settings tab.
    • Activate numlock.
    • Figure 16
  5. Most, if not all, laptops are equipped with Bluetooth. To make Bluetooth reliably work remove the default installed software and install BlueMan Bluetooth software.
    sudo apt remove blueberry
    sudo apt install blueman

    Above terminal commands install the Blueman package from the Ubunutu/Mint repositories. As with all packages in the repositories, it is very likely that there is a newer version available elsewhere. Below describes how to install the latest version of Blueman. But: Below description might make Blueman unusable! Test it, when Blueman afterwards no longer works, remove the entire Blueman package and take Blueman from the Mint repositories. The repository provided below are pointing to git storage with the most up to date version of Blueman. This new version often depends from other new packages not yet available for Linux Mint.
    • In order to get the Bluetooth manager software updated automatically setup the PPA site.
    • Start a terminal.
    • Add the public key to apt by typing or copying below line.
      sudo curl https://cschramm.eu/blueman/debian/blueman.gpg.key | sudo apt-key add -
    • Next, add the PPA sources to /etc/apt/sources.list.d directory.
      Pick the right Python version depending on your distribution. For Mint 19 this is: deb https://cschramm.eu/blueman/debian/ python3.6 main
      deb-src https://cschramm.eu/blueman/debian/ python3.6 main
    • Go to the above mentioned directory and launch an editor. Copy the above given lines into the document and save it as blueman-repositories.list.
    • In a terminal type: sudo apt update in order to integrate the newly add repositories into the system.
    • Above instructions can also be found on:
      https://github.com/blueman-project/blueman/wiki/Packaged-versions
    • REMARK: The described issue in the text below is not required anymore after upgrading or installation of Linux-Mint.20.4!
      I leave in the text because it can be usefull on other hardware, with other Ubuntu based distros or ...
      A new install or an upgrade updates at the same time the Blueman tools to the newest version.
      In fact, if Ofono is installed, remove it!
      With Ofono installed the ssytem log fiiles showed that a Bluetooth driver called bluetoothctl was crashing and also reported spurious responces from something
      called snd_hda_intel. These crashes did not affect the functioning of the PC nor the Bluetooth stuff but it created a lot of lines in the system log files.
    • After reboot of the PC, a Linux Log file reported: "[pulseaudio] backend-ofono.c: Failed to register as a handsfree audio ...... ..." .
      This was Bluetooth related and installing ofono solved the issue.
    • Open a terminal and enter: sudo apt install ofono
      When done, enter systemctl enable ofono.
    • A final REMARK: When after an upgrade to Linux-Mint.20.4 Bluetooth does seems stuck or no longer working, try this:
    • After a boot or restart Blueman should start automatically and show an ativity icon in the toolbar.
    • Open Blueman and remove all installed/connected devices from the showed list.
    • Turn Bluetooth off and reboot.
    • After the reboot Blueman will be running again, open it.
    • Let it discover all Bluetooth devices and install them again.
    • Everything should work as before.
  6. Install codecs to be able to play movies and music.
    sudo apt install mint-meta-codecs
  7. Install Microsoft fonts.
    You can use the Linux Software Manager or the Synaptic package manager to do so.
    • Launch the Software Manager and type in the search entry: ttf-mscorefonts-installer
    • Click install.
  8. Setup a firewall. Setting up a firewall can be a complicated business and hence Linux Mint comes pre-installed with UFw (Uncomplicated Firewall). Just search for the Firewall icon in the *System Settings* window and enable it at least for the Home or Public mode.
  9. While having System Settings open. make use of it to set and configure all other kind of things, keyboard, mouse, display, background, window behavior, and etcetera.
    Some hints:
    1. To change the size and inter-icon distance of the on desktop icons, right click somewhere in empty desktop space. Select from the fall-down menu [Customize] In the pop up window select the **icon size** by clicking the button at the right.
      Select the vertical and horizontal icon inter-distance by moving the vertical and/or horizontal slides at the right side and bottom of the window.
    2. Change the size of the panel (bottom) and icons in it by opening the [System Settings] - [Panel]. Move the slide [Panel hight] and set a fix size for the different zones in the panel.
      Set there also the panel action, always visible or hide (two options).
    3. To rearrange the applets on the Panel, first right-click on a blank spot on the panel, and then enable *Panel Edit Mode* from the menu that appears. The blank areas on the panel will turn pale green once *Panel Edit Mode*. Left-click on the applet you want to move, hold down the left button, and then drag the applet to its new location on the panel. Turn the *Panel Edit Mode* off afterward.

Install Necessary Software

VPN

A must have these days in my opinion.
Install openVPN and subscribe to a VPN provider as NordVPN.

  • Subscribing to a VPN service delivers you a password and user ID necessary to use the VPN bridges.
    • Once subscribed, download the list with VPN access points and their configuration.
      Change to a directory where the downloaded file can be saved, example: /Downloads
      Download the configuration and access files.
      sudo wget https://downloads.nordcdn.com/configs/archives/servers/ovpn.zip
    • Unzip the downloaded ovpn.zip
    • file.
      The result is two directories *ovpn_udp* and ovpn_tcp.
      Each directory contains the settings for connection protocol severs you can use.
      REMARK: It seems that the .ovpn files are no longer available as .zip file.
      But need to be downloaded as individual file(s) per VPN accesspoint.
    • REMARK: When while downloading an error pops up, download ca-certificates sudo apt-get install ca-certificates and start again.
    • REMARK: There is a new and better protocol calle WIREGUARD available.
      To use that protocol one must install the application NordVPN provides and I guess it is the same for other VPN providers.
  • Setup openVPN:
    • Start a terminal window (CTRL+ALT+T).
    • Install openVPN by typing: sudo apt-get install openvpn
    • REMARK: It is very well possible that openVPN is already installed. When it’s the most recent version the terminal will reply with:
                                          
                                              Reading package lists... Done
                                              Building dependency tree
                                              Reading state information... Done
                                              openvpn is already the newest version (2.4.4-2ubuntu1.3).
                                              0 upgraded, 0 newly installed, 0 to remove and 0 not upgraded.
                                          
                                          
    • Copy/move the two protocol access directories to the openVPN setup.
      cd /etc/openvpn/client
      sudo mv /home//Downloads/ovpn_*
    • To test the installation, pick a server form one of the directories.
      The files in the ovpn_udp and ovpn_tcp directories have following format: .nordvpn.com..ovpn
      Example: us349.nordvpn.com.udp.ovpn This is a US access point running the UDP protocol.
      The other way to pick a access point is to go to: and pick the server you want form there.
      Select the country of the server you want to access and the tool provides you the best option for that moment.
    • In the terminal window start *openVPN* and access the server of choice.
    • Examples:
      sudo openvpn us349.nordvpn.com.udp.ovpn or
      sudo openvpn /etc/openvpn/client/ovpn_udp/us349.nordvpn.com.udp.ovpn.
    • Enter your NordVPN account details (username and password).
    • After a login process, displaying text in the terminal screen you should see a successful login.
    • To disconnect type: CTRL+C
  • OpenVPN per Network Manager.
    It is not very handy to need to use VPN via the terminal window, therefore it is possible to use a graphical setup. Above proved that openVPN is working. We can use the network manager of Mint to do the same, with a mouse click, as what was typed in the terminal. To make that happening do:
    • Click the network icon in the right-bottom of the screen and select [Network Settings].
      Figure 11
    • Click the ”+“ in the left bottom of the popped up screen.
    • Select in the Add VPN pop up Import from File…
    • Enter your NordVPN User name and Password.
    • Browse to /etc/openvpn/client/ovpn_udp and select the configuration file of the server/access point to be used, like: us349.nordvpn.com.udp.ovpn
    • Click [Add], and close the Network window.
    • Clicking now the network icon in the right-bottom will show a new selection, the VPN access point/sever that’s just add.
      Figure 12
    • To test the VPN connection click the just added VPN link.
      When everything works well, the normal network icon in the task-bar will change into a key-lock and a short pop up shows that you are now on VPN. Figure 13)

    This is a lot handier than running a VPN connection from the terminal.

    Advantages:

    • The VPN connection can be terminated using the slider switch in the network pop up.
    • A list of VPN access points can be add so that each time or when necessary another server/access point can be chosen.

    As easy as it is now to start a VPN session, it is required to each time perform the manual operation to start the VPN service. If you forget to do it, you are vulnerable.

  • Auto start VPN at boot.
    • Click the network icon, possibly changed into a lock when using VPN, and select in the pop up menu [Network Connections].
    • Select in the pop up window the wired or wireless connection used to access the network/internet and clock the little wheel, right of + and -, in the left bottom
      Figure 14
    • Click the [General] tab
    • Tick the square voting box in front of ‘Automatically connect to VPN when using this connection’.
      Select in the box the server/access point that needs to be used as VPN access point.
    • REMARK: before doing this, add first one or more VPN connections as described in OpenVPN per Network Manager
    • [Save] and close the window.

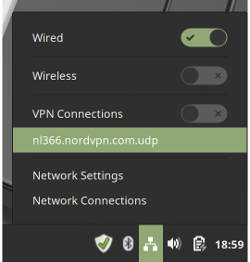
    When rebooting or booting the PC a VPN connection is automatically established and internet connection is always secure. It is also still possible to switch or close the VPN connection using the Network Manager in the bottom right of the screen

NFS

Having a Network Attached Storage (NAS) device for storing backups, photos, music, movies and lots of other things is no longer a luxury. Those NAS devices are most of the time equipped with dual harddisks providing a very safe way to store all kinds of data that cannot be lost. NAS devices can be accessed different ways; some have a web/browser interface but all support SMB (samba) and/or NFS (Network File System) access.

Years ago I’ve been told NFS was difficult to setup and not user friendly and … thus I’ve used for a long time samba to access my NAS devices. Accessing the NAS that way turned very often into issues/problems of folders not wanting to mount, NAS not found, and …. Therefore I decided to try NFS and surprisingly its relative easy to setup, supported in all Linux distributions and access and transfer speed are fast. So, I’m thus setting up on every Linux PC in house a NFS connection to the NAS.

Static NFS mounts

Since the NAS is always running, I setup static NFS mounts, this way:

  • Start a terminal
  • Install the necessary software packages: sudo apt install nfs-common
  • Type in the terminal showmount -e .
    The response in the terminal will be something like:
  •                                 
                                    user@hostname:~$ showmount -e 192.100.1.1
                                    Export list for 192.100.1.1:
                                    /volume1/PublicMedia 192.100.1.1/255.255.255.192
                                    /volume1/Family      192.100.1.1/255.255.255.192
                                    /volume1/Josephine   192.100.1.1/255.255.255.192
                                    /volume1/Marcel      192.100.1.1/255.255.255.192
                                    
                                
  • Create the mount point main directory on the client (PC): sudo mkdir -p /mnt/DiskStation
    Directory name DiskStation can be any possible name (Example: Use the name of the NAS station.). Create the mount point in /mnt. Since /mnt is a directory of the operating system root/sudo access is required in order to create new sub-directories. Sub-directories created as root/sudo get the permissions of root/sudo and when leaving those it possible access issues pop up when trying to access the mount points as normal user.

    Explained with an example:

    • Assume the mount point for the NAS top level is going to be created in */mnt* and will get the name of the NAS drive, Testarossa.
    • Create the mount point thus as: sudo mkdir -p /mnt/Testarossa
    • The permissions of the Testarossa directory will be: drwxr-xr-x 3 root root Testarossa
      As expected, the just created directory is owned by root and by the group of root.
    • Before doing anything else, change the permissions of the top share into those of the user of the system.
      sudo chown Testarossa
      chgrp Testarossa
      Check the changes: ` ls -la /mnt` should report something like:
      drwxr-xr-x 3 Testarossa
  • Create under Testarossa directories with the names of the shared/exported file names of the NAS. In this case, as the earlier given showmount command revealed: Marcel, Josephine, Family and PublicMedia.
  • Make sure the NAS and shared directories are mount at boot, change the /etc/fstab file.
  • Add a mount command line to the fstab file. That line needs to tell what folder of the NAS to mount for what folder on the client. In a lot of cases it needs some tuning with nfs options.
    For the options consult the documentation and blogs on the WWW.
  • Edit sudo xed /etc/fstab and add lines like that below to the fstab file;
    # NFS mounts on Testarossa (Synology NAS)
    NAS.IP.Address:/volume1/ShareDirName /mnt/Testarossa/ShareDirName nfs noauto,x-systemd.automount 0 0
    NAS.IP.Address:/volume1/PublicMedia /mnt/Testarossa/PublicMedia nfs noauto,x-systemd.automount 0 0
  • Save, logout or reboot and log back in.
  • Open the file browser (Nemo) and go to /mnt/Testarossa.
  • Double click on each of the directories in Testarossa and view the sub-directories and files of these directories on the NAS.
  • While in /mnt/Testarossa single click (select) one of the sub-directories and click then in the menu top bar [Bookmarks] [Add Bookmark].
  • This will create a bookmark in the left pane of Nemo called: Testarossa
  • When clicking the bookmark, the NAS sub-directories are shown and ready to be used.

Install programs

Here is the list of programs and tools installed on my computer but depending on what you use the computer for you might need other tools.

Rhytmbox

What is it:

Rhythmbox is a music playing application for GNOME and gnome oriented desktop environments as Cinnamon.

Installation:

Rhytmbox itself is pre-installed with Mint/Ubuntu. When the earlier given instructions for enabling of Bluetooth are followed, Rhytmbox can be used with Bluetooth speakers, headphones or other. The only thing missing is a good equalizer tool to adjust sound to your mood.

When searching the web for install instructions, sometimes the instruction to install "rhytmbox-plugin-complete" is given. THIS IS WRONG! Follow below instructions.

                            
                            sudo add-apt-repository ppa:fossfreedom/rhythmbox-plugins
                            sudo apt update
                            sudo apt install rhythmbox-plugin-equalizer


Synaptic

What is it:

Synaptic is a graphical package Manager for apt (apt-get). Allows to install, remove packages (programs) in the system, and perform other actions associated with managing packages.

Installation:

  • Software manager tool.
  • Normally pre-installed with Linux-Mint, just use it!
  • If it's not sure it's pre-installed or if it's not pre-installed at all do:
    • Start the graphical Software manager
    • Enter in the search box synaptic
      While typing the synaptic package install line will raise to the top of the selection.
    • A green sign right of the name of the tool indicates it's installed and the Software Manager can e closed.
    • When nothing is indicated right of the tools name, click to select the tool and in the new window click the green [Install] button.

Gdebi

What is it:

According to the utility's official documentation: "GDebi lets you install local deb packages resolving and installing its dependencies. apt does the same, but only for remote (http, ftp) located packages."

Installation:

  • Simple tool to view and install DEB files.
  • Normally it is pre-installed with Linux-Mint, just use it. When double clicking a downloaded file with .deb extension, gdebi will start and let you install the new software.
  • When for one reason or another gdebi is not installed, act like for the Synaptic tool above

Gparted

What is it:

  • GNOME partition editor (Hard- Disk management tool). This tool can help managing portable disks and USB drives.

Installation:

  • Normally it is pre-installed with Linux-Mint, just use it. if not, launch the Software Manager and type gparted in the search box. While typing the application raises to the top of the window. Click the gparted line and click the [Install] button.

dconf-editor

What is it:

Starting with GNOME 3.0, for storing system settings uses the GSettings framework, based on the file format dconf. GSettings is used to store environment settings and applications and track their changes. For the user and the applications they are represented as a single "tree" of options, like the Windows registry. In addition, GSettings allows system administrators to limit the change of those or other settings, making them mandatory for users. dconf is a low-level configuration system, the configuration system is based on keys, which stores the settings for most applications. The configuration keys are in the unstructured database (keys are logically interconnected grouped into categories), the key database is stored in a binary file located:

Installation:

  • Launch the Software Manager and type dconf in the search box. While typing the application raises to the top of the window. Click the Dconf-editor line and click the [Install] button.

Bleachbit

What is it:

Clean Your System and Free Disk Space. When your computer is getting full, BleachBit quickly frees disk space. When your information is only your business, BleachBit guards your privacy. With BleachBit you can free cache, delete cookies, clear Internet history, shred temporary files, delete logs, and discard junk you didn't know was there. Designed for Linux and Windows systems, it wipes clean thousands of applications including Firefox, Internet Explorer, Adobe Flash, Google Chrome, Opera, Safari,and more. Beyond simply deleting files, BleachBit includes advanced features such as shredding files to prevent recovery, wiping free disk space to hide traces of files deleted by other applications, and vacuuming Firefox to make it faster. Better than free, BleachBit is open source.

Installation:

  • Launch the Software Manager and type Bleachbit in the search box. While typing the application raises to the top of the window. Click the Bleachbit line and click the [Install] button.
  • When launching Bleachbit from the main Mint menu (Type bleachbit in the top search area. While typing the tool will pop up in the list) and ticking the voting box “Check periodically for software ….” under [Edit] [Preferences] the tool will nearly immediately tell there is an update.
  • Click to get the update/upgrade and from the web page download the version for Mint 19.
  • A .deb file will be downloaded and saved on the system. By default in /Downloads.
  • If not done already, close the running Bleachbit tool.
  • Open with Nemo (file browser) the /Downloads directory and double click the bleachbit_x.x_all_ubuntu1804.deb file. The previous installed Gdebi tool will start and from here the new version of Bleachbit can be installed [Install Package].
  • The Gdebi tool will announce that and older version is available, just answer by clicking [Close] and let to tool install the new version.
  • Restart Bleachbit as user and when down again as administrator.
    • When Bleachbit starts it shows again the Preferences window as pop up.
    • Tick:
      • Hide irrelevance cleaners
      • Overwrite contents of files to prevent recovery (safety option)
      • Exit after cleaning
      • Confirm before delete
    • Click [Close]
  • Select in the left pane of the main menu the options that need to be cleaned out. This will probably be different in normal and administrator mode.
  • Run a clean operation.

dropbox

What is it:

Keep everything organized without breaking your flow. Dropbox brings your files together, in one central place. They’re easy to find and safely synced across all your devices—so you can access them anytime, anywhere. No more wasting the day tracking down work.

Installation:

  • Open a web browser and go to http://www.dropbox.com
  • Click the [Download] button
  • Download the 64-bit .deb file and save it (default in /Downloads).
  • Close the web browser, open Nemo and go to where the dropbox .deb file is saved.
  • Double click the deb file and let gdebi install the tool. It is possible that with the installation some extra files need to be installed, allow it.
  • When gdebi has finished installing, close it and start dropbox from the main menu.
  • This will install more stuff and finally open the dropbox web site asking for credentials.
  • If you have a dropbox account, log in else create an account and log in. Continue and finalize the installation.

Oracle Java

What is it:

Java is a programming language and computing platform first released by Sun Microsystems in 1995. There are lots of applications and websites that will not work unless you have Java installed, and more are created every day. Java is fast, secure, and reliable. From laptops to datacenters, game consoles to scientific supercomputers, cell phones to the Internet, Java is everywhere! The Java slogan of Oracle: Java Powers Our Digital World

Installation:

  • Start a web browser and go to the Oracle Java download page
  • Click on the download icon (It says now, Jul 2019, Java Platform (JDK) 12 but might show an newer version) in the middle of the page Agree to the license terms and download the .DEB file for 64-bit.Figure 20
  • The downloaded file is by default save in the /Download directory.
  • Double click the .deb file or right click the .deb file and select open with gdebi.
  • When gdebi is ready to install the application and before installing click the [Include File] tab.
    Search in the long list of file for /bin/java and /bin/javac.
    In my case the path to
    java looked like; /usr/lib/jvm/jdk-12.0.2/bin/java
    Write the
    * down for later use.
  • Click the [Install Package] button and let gdebi install the tool.
  • When installed close gdebi and open a terminal.
  • In the terminal enter following commands:
                                    
                                    sudo update-alternatives --install "/usr/bin/java" "java" "<some_path>/bin/java" 1500
                                    sudo update-alternatives --install "/usr/bin/javac" "javac" "<some_path>/bin/javac" 1500
                                    The <some_path> is the retained path discovered in gdebi.
                                    
                                
  • Run now following command in the terminal: sudo update-alternatives --config java
    This will pop up in the terminal following text
                                    
                                    here are 2 choices for the alternative java (providing /usr/bin/java).
    
                                      Selection    Path                                         Priority   Status
                                    ------------------------------------------------------------
                                    * 0            /usr/lib/jvm/jdk-12.0.1/bin/java              1500      auto mode
                                      1            /usr/lib/jvm/java-11-openjdk-amd64/bin/java   1101      manual mode
                                      2            /usr/lib/jvm/jdk-12.0.1/bin/java              1500      manual mode
    
                                    Press <enter> to keep the current choice[*], or type selection number: ^C
                                    
                                
  • Do what is asked, press enter to keep the * choice or provide a value and press enter.
  • Add a JAVA_HOME to the environment. Do this to allow programs using Java to know where to go and what to use. In the alternatives menu the path of each install Java version is displayed. Copy the path of the Java install setup as default version.
  • Open and edit /home//.bash_aliases or /home//.bash and add JAVA_HOME to the environments. Add below lines to one of the files:
  •                                 
                                        # Oracle Java
                                        JAVA_HOME=/usr/lib/jvm/jdk-12.0.1/bin/java


Remark:

  • This is an in-between the installation of software item.
  • At the end of all messages after running sudo apt update a message as below can be displayed
                                    
                                        Reading state information... Done
                                        2 packages can be upgraded. Run 'apt list --upgradable' to see them.
                                    
                                
    It is possible to run apt with suggested options in order to get the packages updated/upgraded but it is possibly easier to do the graphical way. After doing this regularly checking the icon in the taskbar keeps the machine up to date with the latest packages.
    • Check the taskbar for the icon of figure 19. When the taskbar is at the bottom of the screen, it will be displayed at the right side.
      • If the icons is displayed as in figure 19, updates to software are available.
      • Click the icon and tick [Install Updates]
      • The the icon will change into the icon as showed in figure 20.
    • Figure 19       Figure 21
      Figure 19 Figure 20

Eid (Electronic ID Belgium)

What is it:

The Belgian eID is an essential element in the chain of trust that provides a framework for safe digital exchanges. By its virtue of certifying the identity of the person doing the exchange and protecting access to citizens' data, the Belgian eID card actively participates in the success of e-Government policy.

Installation:

  • Go to: https://eid.belgium.be/en
  • Click the link: Download eID software for another operating system
  • In the new window that pops up, browse down to the button [Download for Linux], click on it.
  • Click the button: [Download eid-archive.deb]
  • Click [Accept and download] and save it into /Downloads This does not close or do anything else, the windows stays open what can cause confusion.
  • Browse using Nemo to the /Downloads directory.
  • Double click the downloaded eid-archive_..deb
  • Allow gdebi to install the repositories and security keys (that is what the .deb file is).
  • open a terminal
  • Type:
                                    
                                    sudo apt update (the terminal output should include repositories for Eid)
                                    sudo apt install eid-mw
                                    sudo apt install eid-viewer
                                    
                                
  • Attach a card reader or use the build in card reader.
  • Restart the computer.
  • Go to the main menu and start the eid-viewer.
  • Plug your eid card into the reader.
  • Normally, when everything is working the eid-viewer should show the data on the eid card.
  • Leave the card in the reader.
  • Browse to this web page: http://test.eid.belgium.be/
    • Wait a couple of seconds (10) while the card is read.
    • Password will be asked.
    • Click on [Start de test]
    • Normally the test should end by popping up into a new page telling the test is successful.
  • Finally go to this site: https://iamapps.belgium.be/tma/?lang=en
    • Hit [Start test]
    • Hit [Log in]
    • Click [OK] for the user certificate
    • Provide the passcode
    • Wait for "Log in Successful"
    • Click the [Sign Out] button and close the web browser.

Cheese

What is it:

Cheese for Linux uses your webcam to take photos and videos, applies fancy special effects, and lets you share the fun with others. Under the hood, Cheese uses GStreamer to apply fancy effects to photos and videos. With Cheese it is easy to take photos of you, your friends, pets, or whatever you want and share them with others.

Installation:

  • Start the Software Manager
  • Type in the search box: cheese
  • While typing the line with the Cheese tool will raise to the top of the window. Figure 23
  • Click the selection and in the new popping up window click [Install]
  • Possibly extra tools need to be installed, allow this by clicking the [Continue] button.
  • When installed, test Cheese by clicking the [Launch] button.

Deluge

What is it:

Deluge is one of the most used torrent downloaders. It’s stable and easier to use as any other torrent client but the team makes it more stable by providing fix updates.

Installation:

  • Open a terminal and type one line after the other:
                                    
                                    sudo add-apt-repository ppa:deluge-team/ppa
                                    sudo apt update
                                    sudo apt install deluge


Although the default settings work pretty well, it might be useful to tune Deluge for a faster, better download experience. Possibly you can then use this web site. To make Deluge use a VPN connection and that VPN connection only, go here for instructions. With this script installed when there is no VPN running Deluge is killed.

VokoScreen

What is it:

A screencasting tool for Linux. Vokoscreen is a new application that helps you to record your Linux desktop. It’s very simple and it uses a minimalistic GUI.

Installation:

  • To install it, launch the Software Manager and type in the search box: vokoscreen
  • While typing the line with vokoscreen will raise to the top of the window.
  • Double click the line and hit the [Install] button.
    OR
  • To install it open a terminal and type:
                                    
                                    sudo add-apt-repository ppa:vokoscreen-dev/vokoscreen
                                    sudo apt-get update
                                    sudo apt-get install vokoscreen
                                    
                                
  • Find here everything about Vokoscreen

Darktable

What is it:

Darktable is an open source photography workflow application and raw developer. A virtual lighttable and darkroom for photographers. It manages your digital negatives in a database, lets you view them through a zoom-able lighttable and enables you to develop raw images and enhance them.

Installation:

  • Open a terminal and type one line after the other:
                                    
                                    sudo add-apt-repository ppa:pmjdebruijn/darktable-release
                                    sudo apt-get update
                                    sudo apt install darktable
                                    
                                
  • Find darktable stuff here

Pinegrow

What is it:

Pinegrow is a non-free web editor that lets you build responsive websites faster with live multi-page editing, CSS & SASS styling, CSS Grid editor and smart components for Bootstrap, Foundation and WordPress.

Installation:

  • Download it and run the free trial or buy a license. Go for the Pinegrow-Pro version (normally its about $90 but regularly there are sales and then its possible to get up to 25% off).
  • Download the zip file.
  • Open a terminal and do following to get Pinegrow running.
    • First check this: Since Pinegrow 4.2, In case Pinegrow doesn't start on Linux, this is probably because the libnss system library needs to be updated
    • Use Synaptic Package Manager to check if libnss3 is installed. If it is nothing needs to be done, else Launch a terminal ans install libnss as showed below.
        sudo apt-get update
                                sudo apt-get install libnss3
                              
  • Remember that tools are installed in Unix/Linux systems in the /opt directory owned by root. Thus In the terminal change directory to /opt.
  • Make a directory for Pinegrow and call it for easiness Pinegrow.
  •   cd /opt
                              sudo mkdir Pinegrow
                              cd Pinegrow
                            
  • Use the graphical unzip tool, as root/sudo, to unzip the contents of the downloaded zip file into the just created Pinegrow directory.
  • Go back to the terminal and change directory to /opt/Pinegrow. In that directory find a file called pinegrow.desktop.
  • Type: `sudo xed pinegrow.desktop'
  • Exchange the contents of that file with the contents showed here below
      [Desktop Entry]
                              Name[en.US]=Pinegrow
                              Comment=Create Amazing Web Sites
                              GenericName=HTML Editor
                              StartupNotify=true
                              Terminal=false
                              Type=Application
                              Categories=Application
                              Icon=/opt/Pinegrow/Pinegrow.png
                              Exec=/opt/Pinegrow/PinegrowLibrary
                              Keywords=webpages;web;
                              Categories=GNOME;GTK;Internet;
                            
    • REMARK: The icon statement in the file refers to a Pinegrow.png icon file. Possibly this is not present in the downloaded zip file. Select a different icon or download the Pinegrow.png file.
  • Save the file.
  • Copy the pinegrow.desktop file to /home/<user>/.local/share/applications REMARK: It's possible that the directory applications does not exist. If that is the case create the directory and copy then the pinegrow.desktop file into it.
  • Pinegrow is now available as a launcher icon in the start menu [Graphics] collection. Click the icon to launch Pinegrow.
  • Start a 30-day trial period or buy Pinegrow or enter email address and license key.
  • Start working.
  • Find Pinegrow stuff here and tutorials here.

Gimp

What is it:

The Free & Open Source Image Editor

GIMP stands for the GNU Image Manipulation Program. GIMP is a cross-platform image editor available for GNU/Linux, OS X, Windows and more operating systems. It is free software, you can change its source code and distribute your changes. Whether you are a graphic designer, photographer, illustrator, or scientist, GIMP provides you with sophisticated tools to get your job done. You can further enhance your productivity with GIMP thanks to many customization options and 3rd party plugins.

Installation:

Inkscape

What is it:

Inkscape is professional quality vector graphics software which runs on Windows, Mac OS X and GNU/Linux. It is used by design professionals and hobbyists worldwide, for creating a wide variety of graphics such as illustrations, icons, logos, diagrams, maps and web graphics. Inkscape uses the W3C open standard SVG (Scalable Vector Graphics) as its native format, and is free and open-source software.

Installation:

FreeCad

What is it:

Freedom to build what you want. FreeCAD is an open-source parametric 3D modeler made primarily to design real-life objects of any size. Parametric modeling allows you to easily modify your design by going back into your model history and changing its parameters. Create 3D from 2D & back. FreeCAD allows you to sketch geometry constrained 2D shapes and use them as a base to build other objects. It contains many components to adjust dimensions or extract design details from 3D models to create high quality production ready drawings.

Installation:

  • To install the latest version of FreeCad and afterwards get updates when necessary, do:
    • Launch a terminal and enter following
        sudo add-apt-repository ppa:freecad-maintainers/freecad-stable
                                sudo apt update
                                sudo apt install freecad
                              
  • Find all information about FreeCad here.
  • A basics tutorial can be found here.
  • Video tutorials on YouTube can be found here, (this is the first tutorial of a series).

FreePlane

What is it:

Freeplane is a free and open source software application that supports thinking, sharing information and getting things done at work, in school and at home. The software can be used for mind mapping and analyzing the information contained in mind maps. Freeplane runs on any operating system that has a current version of Java installed. It can be run locally or portably from removable storage like a USB drive

Installation:

  • Download the zip file from the FreePlane website (sourceforge) and save it (/Downloads).
  • Create, using Nemo or from the command line in a terminal, a /FreePlane directory in /opt.
  • Unzip the contents of the saved zip file into that directory.
  • Launch a terminal and create a symbolic link for FreePlane
      sudo ln -nsf /opt/FreePlane/freeplane-1.7.9/freeplane.sh /usr/bin/freeplane
                            
  • FreePlane can now be launched from the command line by simply typing freeplane in a terminal.
  • To start FreePlane graphically do:
    • Right click the main menu icon (left-bottom-corner) and select [Configure] in the menu.
    • In the popped up Menu window select [Menu].
    • Click now the big-wide [Open the menu editor] button
    • Select in the left pane an application category, like Engineering, Graphics, Office or ...
    • Hit now in the right pane the [Add Item] button.
    • A small [Launcher Properties] window will pop up.
      • Enter as [Name:] FreePlane
      • Enter as [Command:] : freeplane
      • Enter as [Comment:] : A free mind mapping tool
      • Click the icon in the top-left corner and change the icon to that of FreePlane. get the Freeplane icon from : /opt/FreePlane/freeplane-1.7.9/freeplane.svg
      • Click [Select] and then [OK].
    • Find a FreePlane icon under the Engineering options in the main menu.
  • REMARK:
    • To beautify the whole setup change directory to: cd /home/marc/.local/share/applications
    • In there you will find a file named like below: alacarte-made-2a16d922-c0f9-11e9-8b3a-34e6d7289be6.desktop
    • Right click the file and select [properties] in teh menu.
    • Change under the [Basic] tab the entry named [Name:] to FreePlane.
    • Tick under the [Permissions] tab the box left of "Allow executing file as program".
    • The file named as indicated above will now change into a FreePlane iconized file without extension.
  • FreePlane tutorials on YouTube.

Foxit Reader

What is it:

Foxit Reader is a fast, free, lightweight alternative to Adobe Reader for opening and displaying PDF files. It's also feature-packed. I've been using Foxit Reader since back in the day… The day when Adobe Reader had become a fat slob of a program that took forever to boot and load files. Adobe has improved greatly, but so has Foxit Reader.

Installation:

  • Open a web browser and got here
  • Scroll down to:
    • Foxit Reader - and click the [Free Download] button. Save the download somewhere on disk, by default in /Downloads
  • Extract the "FoxitReader.enu.setup..x64.run.tar.gz" file.
  • Open a terminal and change directory to /Downloads when the extracted file is stored there.
  • Rename the extracted file to FoxitReader.enu.setup.2.4.4.0911.x64.run Remove thus: (r057d814)
  • Type: sudo ./FoxitReader.enu.setup.2.4.4.0911.x64.run
  • Follow the install GUI!
    • Install the Foxit PDF reader in /opt/Foxitsoftware/FoxitReader
    • Accept the license
    • Wait till Foxit is installed and click [Finish].
  • Start Foxit Reader and set the preferences; [Edit]-[Preferences] There is a Foxit Reader icon in the Linux-Mint Menu - Office

PDFsam

What's it?

PDFsam Visual PDFsam Visual is a powerful tool to visually compose PDF files, reorder pages, delete pages. Split PDF files into individual pages, delete or rotate pages, easily merge PDF files together or edit and modify PDF files. A free and open source application, a powerful visual tool or a professional PDF editor, join thousands of happy users, we have the solution you are looking for.

Installation:

  • Start a web browser and go to.
  • Click the [Download] button/tab.
  • Download the .deb file of the PDFsam Basic.
  • Save the downloaded file. By default in /Downloads
  • Open a file browser and open the /Downloads directory
  • Double click the "pdfsam__amd64.deb" file to make Gdebi start and load the file for installation.
  • Let GDebi install the tool.

Texlive

What is it:

TeX Live is an easy way to get up and running with the TeX document production system.

Installation:

  • Start a web browser and go to: https://tug.org/texlive/acquire-netinstall.html
  • Click on the download for a install-tl.zip file and save it (/Downloads)
  • Extract the zip file. The result will be a directory called install-tl-
  • Launch a terminal and change into the directory created by the unzip operation.
  • Run the install script ./install-tl -gui
    • REMARK: The GUI installer needs Tcl/Tk! When it is not installed yet, go to the Tcl/Tk chapter and install it first. When the GUI is started it offers very few options, but there is an ‘Advanced’ button for more configuration options.
  • Run the install script ./install-tl -gui text
    • The most important in the install script is the install location .
    • Type 'D' [enter] and then [1] enter
    • Provide the install directory /opt/TexLive/<year>
    • Type '5' and enter the location for personal files `~/.TexLive
    • Enter 'R' to return to the main menu
    • Enter 'I' to start the installation process.
  • Installing TexLive will take a while, so be patient.
  • ........ (waiting)
  • When installed, or even during install, add the TexLive installation to the path.
    • In the user home directory, open with a edit, xed, the .bash_aliases or .bashrc file.
    • Add following lines to the file and save it afterwards.
        export TL_ROOT=/opt/TexLive/2019
                                export PATH=$PATH:TL_ROOT/bin/x86_64-linux
                              

Texmaker

What is it:

Texmaker is a free, modern and cross-platform LaTeX editor for linux systems that integrates many tools needed to develop documents with LaTeX, in just one application. It includes unicode support, spell checking, auto-completion, code folding and a built-in pdf viewer with synctex support and continuous view mode. Texmaker is easy to use and to configure. Texmaker is released under the GPL license .

Installation:

  • In a web browser go to: https://www.xm1math.net/texmaker/download.html
  • Select, download and save the Linux Package for Ubuntu 18.04 - 64-bit.
  • Double click the saved texmaker_... .deb file and install Texmaker.
    • Gdebi will start and install TexMaker.
    • REMARK: Probably a tool called libqt5script5 will need to be installed.
    • Close Gdebi and use the Synaptic Package Manager to install this libqt5script5.
  • Double click the saved texmaker_... .deb file and install Texmaker.
  • Click the main menu button, select the Office group of programs and find a Texmaker icon ready to be used.
  • For updates, a timely visit to the Texmaker website or click the [Help] tab in Textmaker selecting [Check for Updates].

LaTeXDraw

What is it:

LaTeXDraw is a graphical drawing editor for LaTeX. LaTeXDraw can be used to:

  • Generate PSTricks code;
  • Directly create PDF or PS pictures.

LaTeXDraw is developed in Java (Java 8 is needed).

Installation:

  • To install LaTeXDraw, go to the web page of the tool and hit the [Download] button.
  • Download (from sourceforge) the LaTeXDraw-.zip file and save it.
  • Unzip the downloaded zip file.
  • Launch a terminal and change directory into the created LaTeXDraw- directory.
  • REMARK: Java 8 or later must be installed before installing LaTeXDraw! If Oracle java, when that is the Java tool of choice, is not yet installed, install it now. By default OpenJDK Java is installed. Check the version by typing in the terminal java --version.
  • Run as root/sudo the debian-ubuntu script to install LaTeXDraw sudo ./install_debian_ubuntu
  • Immediately after entering the sudo password this error message will pop up.
      ./install_debian_ubuntu: 3: ./install_debian_ubuntu: gksu: not found
                            

    This error is correct because the gksu package, which provides GTK+ front-ends for su (gksu) and sudo (gksudo), is removed from Ubuntu 18.04 and Linux Mint 19 Tara repositories, so it won't be available anymore starting with this Ubuntu/Mint release. Editing the install_debian_ubuntu script learns that the file contains one line: gksu java -jar installer.jar. This is necessary when the script is run as normal user.

  • To install LaTeXDraw type and run: sudo java -jar installer.jar. This will start a graphical installer tool.
  • Click [Next]. The default install directory is set to /opt what the default install folder is for Unix/Linux applications.
  • Click [Next]
  • Click [End]
  • Find in the main menu under the Office selection a LaTeXDraw icon. Click it to launch LaTeXDraw.
  • For updates, a timely visit to the LaTeXDraw website is necessary!

Typora

What is it:

Typora provides a seamless experience as both a Markdown reader and a writer. It removes the preview window, mode switcher, syntax symbols of markdown source code, and all other unnecessary distractions of other markdown readers & writers.

Installation:

  • To install Typora go to the Typora web site and click the down arrow at the bottom of the page.
  • In the new page click the [Download] button (top - right) and then click the [Linux] button.
  • Follow the on-screen instructions.
  • Launch a terminal and copy - paste - execute the instructions provided on the web page.
      wget -qO - https://typora.io/linux/public-key.asc | sudo apt-key add -
                              # Mint repository add
                                  echo -e "\ndeb https://typora.io/linux ./" | sudo tee -a /etc/apt/sources.list
                              # Ubuntu repository add
                                  sudo add-apt-repository 'deb https://typora.io/linux ./'
                              sudo apt update
                              sudo apt install typora
                              sudo apt upgrade
                            
  • This entire document is written using Typora!

Pandoc

What is it:

Pandoc is a universal document text converter. Typora is using it to support file import/export features for several file types (pdf, html, docx, ...). The GitHub Atom text edit is also using it.

Installation:

  • When running Typora, find under the [Help] tab a menu item [Install and Use Pandoc].
  • Clicking this menu item opens a Pandoc 'what is it' and install page.
  • Download the installer, .deb file, from download page save and install it or when having an older version, update Pandoc.
  • Double click the saved pandoc-<version.-amd64.deb file and allow Gdebi to install Pandoc.

Meld

What is it:

Files and directories comparison is the task that is often required, Meld takes this job seriously and is considered one of the best tools to perform comparisons between files, directories, and version control projects. It is widely used by Linux desktop users and app developers to cater their daily comparison needs. Here are some of the noteworthy features of this application.

Installation:

  • Meld is part of the default Ubuntu/Mint repositories. To install it launch a terminal and do:
      sudo apt update
                              sudo apt install meld
                            

Remark:

Whenever the Linux Mint installation is going to be used for scientific use, programming, electronics, testing, and etcetera the below descriptions show part of the path.

Atom

What is it:

Atom is a free and open-source text and source code editor for macOS, Linux, and Microsoft Windows with support for plug-ins written in Node.js, and embedded Git Control, developed by GitHub. Atom is a desktop application built using web technologies. Most of the extending packages have free software licenses and are community-built and maintained. Atom is based on Electron formerly known as Atom Shell, a framework that enables cross-platform desktop applications using Chromium and Node.js. It is written in CoffeeScript and Less.

Installation:

  • Goto the Atom web page.
  • Click the [Download .deb] button and save the file on you system (by default it's saved in /Downloads).
  • Browse into the directory where the atom-amd64.deb file is saved.
  • Double click the file to launch Gdebi-gtk and load the .deb file in it for installation.
  • Possibly Gdebi makes a remark about the fact that three extra packages need to be installed first. A [details] button provides more insight.
    • To be installed are: git, git-man and liberror-perl
    • Click the [Close] button
  • Click now the [Install Package] button in the main Gdebi window and allow that the three earlier named packages are installed. Click [Continue].
  • The three packages and Atom are now installed.
  • When done close Gdebi.
  • There should now be a Atom icon in the [Menu] - [programming] section.
  • launch Atom and configure it.
  • When Atom starts there is a [Telemetry Consent], a [Welcome] and a [Welcome Guide] opened.
    • Telemetry Consent: Chose here what you want the editor does, send usage data or not, while using it.
    • Welcome Screen - Welcome Guide: There are useful links displayed here. If Atom is completely new, it's always a good idea to click the links and learn how Atom behaves. If you don't want to see this screen each time Atom starts, untick the "Show Welcome Guide when opening Atom" box.
  • Close the three documents.
  • Click [Edit] - [Preferences] to setup Atom following your needs. I'm providing here how I've configured Atom. Only the items I've modified/changed are listed here below.
    • Core Settings:
      • Project Home: I've not set it but this is important for GitHub to store projects.
      • Reopen Project Menu Count: 10
      • Restore Previous Windows on Start: No
    • Editor Settings:
      • Font Family: add at the end of the line ", Ubuntu" (no "").
      • Font Size: 10
      • Line Hight: 1.4
      • Preferred Line Length: 96
      • Scroll Sensitivity: 50
      • Tab Length: 4
      • Tab Type: soft
    • Chose a Theme
      • UI Theme: Atom Light
      • Syntax Theme: Atom Light
    • Install To find packages go here. To install a package, start typing the name of the package in the entry bar. While typing the package will float to the top of the list. I have below given packages installed:
      • Column-Select
      • Highlight-Selected (Can be configured)
      • Language-Markdown (Can be configured)
      • Language-Vhdl (Can be configured)
      • Linter-Markdown (Can be configured) This will also install below packages. Allow it! Click [Yes]
        • Linter
      • Linter-ui-default (Can be configured) This will also install below packages. Allow it! Click [Yes]
        • Intentions
        • busy-signal
      • Linter-vhdl (Can be configured)
      • Markdown-preview-enhanced When Typora and Pandoc are installed configure this package
        • Tick the voting box in front of [Use Pandoc Parser]
        • Open a terminal and type: which pandoc
        • Type the resulting output in the [Pandoc Options: Path] entry.
        • When LaTeX is installed as earlier described, then: Enter in the [LaTeX Engine] bar: /opt/TexLive//bin/x86_64-linux/pdftex
        • Return to [Install]
      • Minimap (Can be configured)
      • Minimap-highlight-selected
      • Split-diff Eventually configure the colors this package uses to show differences between file contents.
      • Vhdl-entity-converter (Can be configured)
      • Xilinx-snippets This is a home made package, not published to GitHub yet.
  • Click [Packages] - [Settings View] - [Manage Packages]
    • Jump over the "Community Packages" section as these are the packages installed following above list. Scroll down to "Core Packages".
    • Below list are the core packages I've disabled.
      • Language-clojure
      • Language-csharp
      • Language-go
      • Language-less
      • Language-mustache
      • Language-objective-c
      • Language-php
      • Language-ruby
      • Language-ruby-on-rails
      • Language-rust-bundled
      • Language-sass
      • Language-toml
      • Language-yaml
      • Markdown-preview
      • Metrics
      • Welcome
    • Below the core packages I've configured
      • Spell-check
        • Add in the line [Grammars] "source-vhdl"
        • Add in the line [Locales] "en-US, nl-BE, fr-FR" Make sure these language packs are installed before adding this information

Git - GitCola

What is it:

Git Cola is a sleek and powerful graphical user interface for Git. Git Cola is free software and written in Python (v2 + v3). It is mainly for use with GitHub. Github is now part of Microsoft and some people don't like that. Those can use Bitbucket. Then the use of the free version of GitKraken might be more useful than GitCola

Installation:

  • Open a terminal.
  • Enter following lines, one after the other, in the terminal.
      sudo apt update
                              sudo apt install git-cola
                            
  • Git-Cola is now add to the Linux-Mint menu structure under the heading "Programming".

GitKraken

What is it:

GitKraken is an application for working with Git and includes two tools: the Git Client and Glo Boards. Developers can track code changes, switch between branches and projects, and visualize workflow through the application. Users can track tasks from inside the GitKraken Git Client, VS Code, Atom, or a browser using Glo Boards.

The GitKraken Git Client is free for open source, early-stage startups and non-commercial use.

web:

Installation:

  • From the web page above, download and save the deb file for Ubuntu and Mint OSses.
  • Double click the saved deb file in order to autostart the installation per the Gdebi tool.
  • Once the installation is finalized, start the tool from the [Menu] [Programming] section.
  • To start using the tool with Bitbucket and/or GitHub, watch the video: "How to use Bitbucket with GitKraken" on this page.

Remark:

Of course in order to do something meaningful with GitCola and/or GitKraken it is necessary to have an account with GitHub or Bitbucket and also be a registered user for GitKraken.

Cmake

What is it:

CMake is an extensible, open-source system that manages the build process in an operating system and in a compiler-independent manner. Unlike many cross-platform systems, CMake is designed to be used in conjunction with the native build environment. CMake is designed to support complex directory hierarchies and applications dependent on several libraries. For example, CMake supports projects consisting of multiple toolkits (i.e., libraries), where each toolkit might contain several directories, and the application depends on the toolkits plus additional code. CMake can also handle situations where executables must be built in order to generate code that is then compiled and linked into a final application. Because CMake is open source, and has a simple, extensible design, CMake can be extended as necessary to support new features. Using CMake is simple.

Web:

Installation:

  • Open a command window and run, one after the other, the lines provided below.
  •   wget -O - https://apt.kitware.com/keys/kitware-archive-latest.asc 2>/dev/null | sudo apt-key add -
                              sudo apt-add-repository 'deb https://apt.kitware.com/ubuntu/ bionic main'
                              sudo apt update
                              sudo apt install kitware-archive-keyring
                              sudo apt-key --keyring /etc/apt/trusted.gpg del C1F34CDD40CD72DA
                              sudo apt install cmake
                            
  • When above commands are run in a terminal Cmake is installed as comamnd line version. There is a GUI available for Cmake that can be installed from the Software Manager platform.
  • Open the Software Manager and type in the search box "cmake". The first entry in the appearing list of tools is Cmake and it got a green OK mark.
  • The third entry is the one for Cmake-qt-gui. Click on it and hit the [Install] button.
  • After it's installed, check it by hitting the Linux Mint Menu button and then [Programming] [Cmake].

Tcl-Tk

What is it:

Tcl (Tool Command Language) is a powerful, open source, business-friendly and easy to learn programming language. Tcl is a mature yet evolving language that is truly cross platform, easily deployed and highly extensible. It is suitable for a very wide range of uses, including web and desktop applications, networking, administration, testing and many more.

Tk is a graphical user interface toolkit that act as the standard GUI for not only Tcl but for many other languages It can can produce rich, native applications that run unchanged across Windows, Mac OS X, Linux and more.

Web:

  • The main Tcl-Tk web can be found here
  • On the software page of the Tcl-Tk web page several ways to get and install the software are presented. The Tcl-Tk version preferably used is that from ActiveState and can be downloaded here. ActiveState actively maintains the latest version and updates of Tcl-Tk, but to keep up withe new version releases of the language one must regularly visit the ActiveState web page, download and install new versions when required.

Documentation

Find here beside software; tutorials, manuals and links to all kind of other related stuff.

Installation

  • Download the latest version of the Tcl-Tk software from the ActiveState web side. Probably you’ll need to make an account in order to get it.
  • Save the download on the machine, by default it goes into /Downloads . The latest version downloaded as of July 2019 is: ActiveTcl-8.6.9.8609.2-x86_64-linux-glibc-2.5-dcd3ff05d.tar.gz
  • Uncompress the file in the /Download directory. A directory ActiveTcl--x86_64-linux-glibc- will be created.
  • start a terminal and change into the above given directory. cd ActiveTcl-8.6.9.8609.2-x86_64-linux-glibc-2.5-dcd3ff05d
  • Run the install.sh script as root (sudo) and install the Tcl-Tk tooling in /opt/ActiveState.
    • Accept the list of what is going to be installed, hit [enter].
    • Accept the license of ActiveState by typing [A]
    • Provide the path where ActiveState Tcl-Tk will be installed or accept the default value. The default value is /opt/ActiveTcl-8.6 Hit [enter]cd ..

      -

    • Provide the path where demo design will dropped or accept the default. Hit [enter]
    • Specify the runtime installation or accept the default given value. Hit [enter]
    • Hit [enter] to start the installation.
    • At the end of the installation some settings are provided. Open the .bash_aliases or .bashrc file with a text editor. xed ~/.bash_aliases or xed ~/.bashrc
    • Add following lines to one of the files.
        # TCL-TK settings (ActiveState)
                                export TCLTK_ROOT=/opt/ActiveTcl-8.6
                                export PATH=$PATH:$TCLTK_ROOT/bin:$TCLTK_ROOT/lib
                                export MANPATH=$TCLTK_ROOT/man
                              

Pyenv

What is it:

Python, like most other modern programming languages, has its own unique way of downloading, storing, and resolving packages. Pyenv is a simple, powerful and cross-platform Python version management tool. pyenv is a wonderful tool for managing multiple Python versions. Even if Python is already installed on the system, it is worth having pyenv installed so that it is easy to try out new language features or help contribute to a project that is on a different version of Python.

“System Python” is the Python that comes default installed with the operating system. If Python is already installed, why not use it? One way to look at it is that this "System Python" really belongs to the operating system. After all, it came installed with the operating system. Installing add-ons and new packages must be done system wide, as sudo, and there is the risk to get different versions of the same package with different tools. At the end it can end up in a real mess and create nightmares to be able to run tools. So leave the "System Python" what it is and use a dedicated Python for all programming work. pyenv even allows the use of different versions of Python on the same system.

Thus when multiple versions of Python are needed or when wanting to keep teh operating system clean and save when programming in Python, install pyenv.

Virtual environments are kind of different. that are isolated independent environments that can have both a specific version of Python and of any project-specific packages installed within them, without affecting any other projects. This is handled by tools, packages as venv.

pyenv is one of the most important tools that most of the Python developers use.

Web:

Great installation notes are available with the pyenv documentation Useful FAQ along with common build problems are also available.

Installation:

  • Launch a terminal and copy below into it.
  •   sudo apt install -y make build-essential libssl-dev zlib1g-dev \
                              libbz2-dev libreadline-dev libsqlite3-dev wget curl llvm libncurses5-dev \
                              libncursesw5-dev xz-utils tk-dev libffi-dev liblzma-dev python-openssl
                            
  • After all above is installed install the real pyenv. It's not necessary to use sudo because pyenv is installed for you user of the system.
  •   curl https://pyenv.run | bash
                            
  • When done, change the .bashrc or .bash_aliases and add following lines:
  •   export PATH="/home/marc/.pyenv/bin:$PATH"
                              eval "$(pyenv init -)"
                              eval "$(pyenv virtualenv-init -)"
                            
  • Close the terminal and open it again to install Python in the next stage. Closing and reopening the terminal makes sure the modifications to the .bashrc or .bash_aliases file are going to be used.

Python

What is it:

Python is a general-purpose programming language that can be used on any modern operating system. It is used for processing text, numbers, images, scientific data and just about anything else you. Examples where it is used: Google search engine, YouTube, NASA and even the New York Stock Exchange.

Python is an interpreted language. This means that it is not converted to computer-readable code before the program is run but at runtime. In the past, this type of language was called a scripting language, intimating its use was for trivial tasks. However, programming languages such as Python have forced a change in that nomenclature. Increasingly, large applications are written almost exclusively in Python. Some ways that you can apply Python include:

Web:

Remark:

For much more about Python, Jupyter Notebook (Jupyterlab), Using Python and QT, MyHDL and more view the Python and Tools document.

Installation:

Pyenv is installed, so it will be used to install one or multiple versions of Python. When using pyenv to avoid the use of the installed "System Python" one one or two versions need to be installed. With pyenv you can check first what versions of Python are available.

  • Launch a terminal if it's not already done at the end of the pyenv installation.
  • Type or copy following: pyenv install --list | grep " 3\.[6789]".
  • To view ALL available versions type or copy: pyenv install --list.
  • Running the first above command shows all Python 3 versions from sub-version 6 to 9. the second command list all versions of everything that has to do with Python (a very long list). Unless you are really a advanced Python developer you're not going to use development (dev) version of the language. Use the most recent released version and that is Python_3.7.4. Because it's still used, let's also install the last version of Python 2, being 2.7.16
  • In the terminal type or copy from here:
      pyenv install -v 3.7.4
                            

Run each of the commands and wait till finished before running the other.

  • After installing both Python versions check where they are installed by typing the command ls ~/.pyenv/versions/ and pyenv versions. The result of the latter command is: Figure 28 The * in front of system means that the System Python version is in use.
  • To use one of the just installed versions on your system type below in the terminal: pyenv global 3.7.4 and check if the version sis now in use by typing pyenv versions . The * should be moved in front of the 3.7.4 version.
  • A good way to check that the just installed and selected version is in use is by running the Python build in test suite. Type in the terminal python -m test Running the Python test suite might take a while!

Python packages

When using Python and needing certain or specific functions one does not need to invent then, there is PyPi . PyPi is a site with thousands of packages written in and for Python. These packages are written by users for users and having simply an account for PyPi allows on eto use all that power. Perhaps, one day, you can put a own written package on PyPi so that other people can use it.

Below a list of "necessary" Python packages. Install all, none or some of these and maybe install even other packages you might need while developing tools in Python. A good rule is to look in PyPi when something particular is required during programming.

  1. Sphinx Sphinx is a tool that makes it easy to create intelligent and beautiful documentation, written by Georg Brandl and licensed under the BSD license.
  2. Requests the most famous http library written by kenneth reitz. It’s a must have for every python developer.
  3. NumPy how can we leave this very important library ? It provides some advance math functionalities to python.
  4. SciPy when we talk about NumPy then we have to talk about scipy. It is a library of algorithms and mathematical tools for python and has caused many scientists to switch from ruby to python.
  5. matplotlib a numerical plotting library. It is very useful for any data scientist or any data analyzer.
  6. SymPy can do algebraic evaluation, differentiation, expansion, complex numbers, etc. It is contained in a pure Python distribution.
  7. Pillow a friendly fork of PIL (Python Imaging Library). It is more user friendly than PIL and is a must have for anyone who works with images.
  8. SQLAlchemy a database library. Many love it and many hate it. The choice is yours.
  9. BeautifulSoup 4 xml and html parsing library which is very useful for beginners.
  10. Twisted the most important tool for any network application developer. It has a very beautiful api and is used by a lot of famous python developers.
  11. nose a testing framework for python. It is used by millions of python developers. It is a must have if you do test driven development.
  12. PySide2 Qt for Python is the project that provides the official set of Python bindings (PySide2) that will supercharge your Python applications. While the Qt APIs are world renowned, there are more reasons why you should consider Qt for Python. The first official release of the PySide2 module is available now!
  13. MyHDL turns Python into a hardware description and verification language, providing hardware engineers with the power of the Python ecosystem.
  14. Jupyter Notebook / JupyterLab

To install a package do:

  • Open a web browser and go to: https://pypi.org/
  • In the "Search Objects" bar enter the name of the package that needs installed and hit [Enter].
  • When the package is available and extensions, add-ons for the package exist it will pop up in a web page with kind of the same structure as the Linux Mint Software Manager. The most relevant package will end add the top of a list of similar packages.
  • Click the square with the package that needs installed to open a package dedicated page. Find here links to the package home page, documentation, source code, download and much more.
  • There are several ways to install the package, two are listed here:
    • One:
      • Launch a terminal and type pip install <package_name>.
      • The package will be installed.
    • Two:
      • Click the [Download Files] button and then download and save the 'wheel' file for the Phyton version used (Pyhton_3.7.x reflects in the file name as cp37) and x86-64-bit Linux. Hint: Maybe save the wheel files for the used Python version in a reserved directory. I've created in the ~/.pyenv directory a ./Wheels/3.4.7 directory to hold the wheel files for Python_3.7.4.
      • When all required/ wanted wheel files are downloaded and saved start installing the packages.
      • Launch a terminal and type: pip install ~/.pyenv/Wheels/3.7.4/<package_wheel_file_name>
    • Some packages will need to be installed following 'One' other can be installed either of both 'One'/'Two' ways.
    • To show all installed packages type in a terminal pip list.
  • Remark: After having installed a package, it's possible that Python complains about the version of pip. Upgrade it using the command given in the warning message pip install --upgrade pip.

QT

What is it:

Qt is a free and open-source widget toolkit for creating graphical user interfaces as well as cross-platform applications that run on various software and hardware platforms such as Linux, Windows, macOS, Android or embedded systems with little or no change in the underlying codebase while still being a native application with native capabilities and speed. Qt is developed by The Qt Company, a publicly listed company, and the Qt Project under open-source governance, involving individual developers and organizations working to advance Qt

Web:

https://www.qt.io/

Installation:

Qt will be installed for use with Python.

The Open Source version of the QT tools will be installed. This holds that some obligations need to be fulfilled by the user. Please read the text about licensing and obligations on the Qt web site.

  • Launch a terminal
  • Launch a web browser and go to the Qt web page. Hit the [Download. Try. Buy] button in the right-top of the page.
  • Scroll down on the new page and select the [Go open source] button.
  • Read on that page the obligation, restrictions between commercial and Open Source versions of Qt.
  • Scroll down the page an hit the [Download the QT Online Installer] button.
  • Download and safe the installer file.
  • Launch a terminal and change directory to where the installer file is saved.
  • Change the permissions of the file to make it executable chmod 775 qt-unified....run.
  • Run the installer sudo ./qt-unified-linux-x64-<version>-online.run
  • A GUI will open.
    • Install the QT tools in /opt/Qt
    • Provide your login and password for the QT repositories.
    • Install the tools you need.
  • The Linux Mint menu will now have a "Qt Creator (Community)" icon in the Programming tab. This allows one to graphically create GUI interfaces. Read the Python and Tools document for proceedings!

KiCad

What is it:

A Cross Platform and Open Source Electronics Design Automation Suite. Now, June 2019, at version 5.1.

Web:

Documentation:

  • Available at install of the tool.

Remark

View, read the Use KiCad document for detailed information about the use and maintenance of KiCad.

Installation:

sudo add-apt-repository ppa:js-reynaud/kicad-5.1
                        sudo apt update
                        sudo apt install --install-suggests kicad
                        

KiCad add-ons

Libaries

Libraries are included along with KiCad installation. Downloading the libraries above is only necessary when a newer version is required than the one offered with the installed KiCad version. Libraries can be kept up to date with the latest additions by cloning the library repositories using Git. Tracking the library repositories using Git means that only the changes to the libraries need to be downloaded, rather than retrieving the entire library set each time. It is also a good idea to download the libraries and keep them up to date in case there is no internet connection available.

There are also third party libraries available form:

  • Digi-Key maintains an atomic parts library for KiCad on their GitHub page. These libraries are licensed under an agreement similar to the official libraries.
  • SparkFun Electronics provide KiCad library files for many of their products on their GitHub page. These libraries are based on the SparkFun Eagle libraries.
  • SnapEDA provides KiCad symbol and footprint libraries for their customers. The libraries are freely available and can be found on their KiCad library page. The library license can be found on their terms of service page.

More to come

GHDL

What is it:

The open-source compiler and simulator for VHDL, a Hardware Description Language (HDL). GHDL is not an interpreter: it allows you to analyze and elaborate sources to generate machine code from a design. Native program execution is the only way for high speed simulation.

Web:

Documentation:

Installation:

  • REMARK: A upfront remark about GHDL. Installing GHDL is not the easiest thing to do, especially for a new-bee user! If you want a VHDL simulator that installs “easy”, then spend a couple of thousand euro/dollar. But for the results of simulation you just should not.
  • GHDL comes periodically as pre-build binary package for different distributions through the GHDL github page releases tab. That is one way to install GHDL when the released binary package is available for the Linux distribution used.
  • An other way is to download or clone the most recent released version of GHDL, then build and install it. GHDL can be build three different ways, each has its pros and cons.
  • There are no repositories for GHDL, it is thus necessary to visit on timely base the GHDL-Github page and install the newest versions the way described here.
GHDL sources:
  • Clone or download the zip file of GHDL onto your computer. By default it ends up in the /Downloads directory as ghdl-master.zip.
    • Unzip/extract the file. It creates a directory ghdl-master with sub-directories and files.
    • Leave it here for now.
    ADA Compiler:

GHDL is written in ADA. Every way of setting up GHDL needs a ADA compiler. That will thus be the first action to accomplish.

  • Get a ADA compiler from libre.adacore.com.
  • Click the big [GNAT COMMUNITY] button to download the ada compiler.
  • Select the latest version for Intel machines: x86 GNU Linux (64 bits) download and safe it.
  • Change to where the package is downloaded. default is this: /Downloads.
  • Make the downloaded file executable: chmod +x path_to_the_package/gnat-comunity-...-bin
  • Execute the file: sudo ./gnat-community-<year>-<version>-x86_64-linux-bin
  • Follow the steps to install gnat presented by the installer. Click [Next].
  • Remark that the installer targets the /opt directory! Click [Next], [Next], [Next] and [Install].
  • Finally click [Finish].

To recognize the just install GNAT tool add below lines to the .bashrc or .bah_aliases file:

# GNAT GPL (ADA Compiler) for GHDL
                        export PATH=$PATH:/opt/Gnat/2019/bin
                        

Save the file and open a new terminal window for the rest of the installation.

Two GHDL build options provide a lot of simulation possibilities, the first is when GHDL is build using the Low Level Virtual Machine (LLVM), the second when the GNU Compiler Collection (GCC) approach is taken. Although GCC is default available with each Linux installation it is a lot more difficult than it is using the LLVM way. In both cases extra software needs to be installed before GHDL can be build.

Get and install LLVM.

Install LLVM and CLANG only when it is the plan to build GHDL this way or when the plan is to use C/C++ to write software . Once LLVM and surroundings are installed, it is a lot simpler to build GHDL than with GCC while the possibilities and performance are similar. Although the GHDL documentation states that LLVM can be used till version 5.0 it perfectly works with the latest available version 8. Let’s get it and make it work.

  1. Go to the Debian/Ubuntu page of the LLVM compiler.
  2. Browse down the page to the Ubuntu chapter and find there the version 18.04 (Bionic) repository data for apt.
  3. Open a terminal and change directories to /etc/apt/sources.list.d Start a root a text editor session, sudo xed, and copy the apt lines for latest version in the open document.
  4. Save the document as llvm-eight.list. Use any name but the extension must be .list
  5. Download the archive signature or fingerprint: "6084 F3CF 814B 57C1 CF12 EFD5 15CF 4D18 AF4F 7421". wget -O - https://apt.llvm.org/llvm-snapshot.gpg.key|sudo apt-key add -
  6. Refresh the repositories of the system by: sudo apt update The comments from this action should end without any error, else probably some typo is made.
  7. Remark: The text shows how to install version 9 of LLVM. It is very likely that the latest version of LLVM has a higher ranking number (10 or even ..). If that is the case, replace the 9 in all apt install commands by the latest version number.
  8. Perform these steps one after the other:
    1. Install the LLVM Core libraries. A modern source- and target-independent optimizer, along with code generation support for many popular CPUs.

       apt install libllvm-9-ocaml-dev libllvm9 llvm-9 llvm-9-dev llvm-9-doc llvm-9-examples llvm-9-runtime
                              
    2. Install Clang and co, "LLVM native" C/C++/Objective-C compiler, which aims to deliver amazingly fast compiles (e.g. about 3x faster than GCC when compiling Objective-C code in a debug configuration), extremely useful error and warning messages and to provide a platform for building great source level tools.

       apt install clang-9 clang-tools-9 clang-9-doc libclang-common-9-dev libclang-9-dev libclang1-9 clang-format-9 python-clang-9
                              
    3. libfuzzer apt install libfuzzer-9-dev
    4. lldb. Builds on libraries provided by LLVM and Clang to provide a great native debugger. apt install lldb-9
    5. lld is a new linker. That is a drop-in replacement for system linkers and runs much faster. apt install lld-9
    6. libc++ provide a standard conform and high-performance implementation of the C++ Standard Library, including full support for C++11 and C++14. apt install libc++-9-dev libc++abi-9-dev
    7. OpenMP provides an OpenMP runtime for use with the OpenMP implementation in Clang. apt install libomp-9-dev
  9. Test the installation, type clang-9 -–version When getting an output in the terminal as below, then everything is installed perfectly.
     user@machine:~$ clang-9 --version
                             clang version 9.0.1-svn363027-1~exp1~20190611211629.77 (branches/release_90)
                             Target: x86_64-pc-linux-gnu
                             Thread model: posix
                             InstalledDir: /usr/bin
                            

Remark 1: This are the extra, extra things I had to do to make everything work: Remark 2: The latest version of Mint_19.2 I installed from scratch on a PC already had below zlib1g-dev installed.

  • Go into /usr/bin and find the files clang ls clang* This lists following files: clang-9 clang++-9 clang-cpp-9 clang++-libc++ Create two symbolic links, one for clang and one for clang++ sudo ln -s /usr/bin/clang-9 clang sudo ln -s /usr/bin/clang++-9 clang++ A new ls, list now clang clang++ clang-9 clang++-9 clang-cpp-9 clang++-libc++
  • Install a missing library (zlib1g-dev) This can be done using Synaptic, search for zlib1g-dev, right click and from the menu select [Mark for Installation]. Then click [Apply] to apply the changes or Using the Software manager, type in the search bar zlib, browse down till zlib1g. Click the selection and in the new window click [Install] From the command line, type: sudo apt install zlib1g-dev
Build and install GHDL using LLVM
  1. The downloaded zip file, ghdl-master.zip, has earlier been unzipped and has created a directory ghdl-master in the directory where the zip was saved, normally /Downloads.
  2. Change into that directory. cd ~/Downloads/ghdl-master
  3. Create a build directory, mkdir build, and change into it cd build.
  4. Configure GHDL for you system: ../configure --with-llvm-config=/usr/lib/llvm-9/bin/llvm-config --prefix=/opt/Ghdl
    1. --with-llvm-config=/usr/lib/llvm-9/bin/llvm-config : this is the path where LLVM has been installed when the procedure Get and Install LLVM has been followed. To be sure that the path is correct do a search in Nemo (file browser) for llvm-config.
    2. --prefix=/opt/Ghdl : /opt is normally the directory where user programs are installed so it is used for GDHL.
  5. Run make make
  6. Install the GHDL tool.
    1. In the configuration step it is decided to install the tool in /opt/Ghdl. /opt is a system directory and under control of root (sudo). When running the command sudo make install an error pops up about gnatmake.
    2. Make the user the owner of the Ghdl directory and in one take drop the directory in the users group. sudo chown -R <user> /opt/Ghdl sudo chgrp -R <user> /opt/Ghdl
    3. Remove the already create directories from /opt/Ghdl.
    4. Run make install again but now without sudo Process ends without errors or warnings.
  7. Add GHDL to the path. Edit /home//.bash_aliases or /home//.bash and add Ghdl to the PATH.
  8. DONE.
  9. The installation is done, but it's only possible to simulate straight VHDL. When the VHDL source contains instantiated Xilinx or Lattice Semicon library elements, simulation will fail. It is thus necessary to install one or both of these tools and create simulation libraries for GHDL out of that installation. Creating simulation libraries is easy! Follow the README.md document found in the /opt/Ghdl/lib/ghdl/vendors directory.

GTKwave

What is it:

GTKWave is a fully featured wave viewer for Unix, Win32, and Mac OSX which reads LXT, LXT2, VZT, FST, and GHW files as well as standard Verilog VCD/EVCD files and allows their viewing.

Web:

http://gtkwave.sourceforge.net/

Click here to download the latest release as of July 2019 (gtkwave-3.3.101.tar.gz) and save it on the machine. The /Downloads directory is the default space where downloads get saved.

Documentation:

Can be found here as PDF file.

Installation

There are NO repositories, thus for updates timely visit the gtkwave web site. That is when the most up to date version is wanted because earlier (older) versions are available in Linux Mint repositories and can simply be installed by typing: sudo apt install gtkwave

To install the latest version do this:

  1. Unzip the .tar.gz file obtained from the GTK website. This creates a new directory gtkwave (at time of writing it’s -3.3.101).
  2. Start a terminal and create in the gtkwave- directory a build directory. cd ~/Downloads/gtkwave<verion> and then mkdir build.
  3. Change directory into the build directory cd build
  4. Run the command ../configure -–prefix=/opt/GtkWave The command takes of and generates status text lines ending with an error about TCL.
     checking for Tcl configuration... configure: error: Can't find Tcl configuration definitions. Use --with-tcl to specify a directory containing tclConfig.sh
                            

    The new Mint 19 installation does not seem to have Tcl-Tk installed by default and that is confirmed after a check (type in the terminal tclsh and wish to find out if Tcl and Tk are installed). Thus the first thing to do now is to install Tcl-Tk. Consult the description on how to do this somewhere else in this document. After install and testing of Tcl-Tk come back to this point 4 and run ../configure --prefix=/opt/GtkWave again.

    After installation of Tcl-TK and running ../configure –prefix=/opt/GtkWave the same errors pops up. At least now Tcl-Tk is installed and we know it :-). The error complains about some tcl file that cannot be found. So give the path to the file with the configure command. Do the same for Tk.

    ../configure --prefix=/opt/GtkWave --with-tcl=/opt/ActiveTcl-8.6/lib --with-tk=/opt/ActiveTcl-8.6/lib After running configure with teh above command a lot more status text is displayed in the terminal but it end with an new error message

     configure: error: Couldn't find a usable gperf program.
                             Please install gperf which is available from
                             ftp://ftp.gnu.org/pub/gnu/gperf/
                            

    Install gperf as instructed but use apt to do it. Use this command line: sudo apt install gperf

    Third time configure, good time? run the configure command again. No, it seems that the third time is not the good time because a new error ends configure.

     checking for lzma_end in -llzma... no
                             configure: error: LZMA support for VZT is enabled, but xz could not be found.
                             Please install the xz-devel package, see the http://tukaani.org/xz website, or use the --disable-xz flag.
                            

    A check shows that xz-utils are installed but it seems that the configure command cannot find it. Run the Synaptic tol and [Search] for xz-dev . Synaptic pops up one library: golang-xi2-x-xz-dev. Install that library, right click and select ''Mark for Installation", then hit [Apply]. This will pop up some other stuff that needs to be installed, allow it. ../configure --prefix=/opt/GtkWave --with-tcl=/opt/ActiveTcl-8.6/lib --with-tk=/opt/ActiveTcl-8.6/lib

    This new run end in yet another error

     checking for GTK... no
                             configure: error: Package requirements (gtk+-2.0 >= 2.2.0) were not met:
    
                             No package 'gtk+-2.0' found
                            

Consider adjusting the PKG_CONFIG_PATH environment variable if you installed software in a non-standard prefix.

Alternatively, you may set the environment variables GTK_CFLAGS and GTK_LIBS to avoid the need to call pkg-config. See the pkg-config man page for more details.

   The machine has everything for gtk-3 installed. A search how to get gtk-2 learns to run this command: `sudo apt install libgtk2.0-dev`. Running that command in a terminal seem to install a lot of stuff.

                           Rerun the command: `../configure --prefix=/opt/GtkWave --with-tcl=/opt/ActiveTcl-8.6/lib --with-tk=/opt/ActiveTcl-8.6/lib` and now finally the process ends without warnings or errors.

                           Change the

                        5. Run `make`

                        6. Run the `sudo make install` command to install the GtkWave tool.

                        7. Add GTKwave to the path.
                           Edit */home/<user>/.bash_aliases* or */home/<user>/.bash* and add GtkWave to the PATH.
                        

GTKwave viewer

export GTKWAVE_ROOT="/opt/GtkWave" export PATH=$PATH:$GTKWAVE_ROOT/bin

8. Open a new terminal and check if GtkWave works; type `gtkwave` and watch what happens.
                           An error is what happens.
                        

gtkwave: error while loading shared libraries: libtcl8.6.so: cannot open shared object file: No such file or directory

   That library must be installed when ActiveState Tcl-Tk was installed and a search for it proves it’s installed and available in: */opt/ActiveTcl-8.6/lib*
                           How make GtkWave know that the library is available, well:
                           Open/edit the  */home/<user>/.bash_aliases* or */home/<user>/.bash* again and add following to the Tcl-Tk settings: `export LD_LIBRARY_PATH=$TCLTK_ROOT/lib` and save the file.

                        9. Start a new terminal and run again: `gtkwave` and view the waveforms window popping up.
                           <img src="./Figures/Figure_17.png" alt="Figure 17" style="zoom:50%;" />

                        ## Final

                        Linux Mint 19.2 is installed and all tools needed to start developing hardware and/or software are installed.
                        Not all are installed! because it's now possible to write VHDL and simulate it or write Python and simulate it but it's still not possible to implement what's created. Also some of the tools or tool add-ons relay on not yet installed tools for libraries and other stuff.

                        What's still needed are the tools from Xilinx and/or Lattice Semiconductor.